How to Setup a Raspberry Pi File Server
This tutorial will discuss using the Samba package to set up a file server on Raspberry Pi.
Setup a Raspberry Pi File Server
File servers are used to store and share files. Files can be videos, audio, documents, and images.
We can use the Samba package to set up a file server on a Raspberry Pi. The Samba package uses SMB or server message block and CIFS or common internet file system to share directories of Raspberry Pi with other devices.
The Samba package links two locally connected devices to a router. We can share a directory from the storage of a Raspberry Pi with other devices, but both devices should be connected to the same router.
Samba will allow us to interact easily with the directory environments of Microsoft. Samba is the best package to set up NAS or network-attached storage.
Follow the steps mentioned below to install it.
Update Raspberry Pi
First, make sure the Raspberry Pi is connected to the internet and then use the below commands to update Raspberry Pi.
sudo apt update
sudo apt upgrade
We have to type the above commands in the terminal of our Raspberry Pi one by one to update it, and if it asks for permission, we can enter y to install the package.
Install Samba
We have now updated our Raspberry Pi; we can install Samba. We can use the below command to install Samba.
sudo apt install samba samba-common-bin
If the above command asks permission, we can enter y to install the package.
Create Shared Directory
We have to create a directory that we want to share between both devices, and the directory can be inside the memory card or the external hard drive. If we want to save large files, we should mount an external hard drive with our Raspberry Pi.
Let’s create a directory inside Raspberry Pi’s home directory using the below command.
mkdir /home/ammar/shared-dir
In the above command, we have created a new directory, shared-dir, inside the user ammar directory, which will be shared with other devices. We can give any name to our directory, but we must remember it because it will be used in the next steps.
Note that we should not use sudo to make a directory because the directory created with sudo will only be accessible by the root user.
Modify Samba Configuration File
We have to modify the configuration file of Samba so that it will share the directory that we created in the previous step. We can use the below command to open the configuration file of Samba.
sudo nano /etc/samba/smb.conf
The above command will open a configuration file, and we must add the below lines at the bottom.
[ammarshare]
path = /home/ammar/shared-dir
writeable=Yes
create mask=0777
directory mask=0777
public=no
In the above text, ammarshare defines the share’s address and the Raspberry Pi’s IP address. For example, an address like \\192.168.0.7\ammarshare will link to the shared directory.
Note that we can use the hostname -I command to check the IP address of our Raspberry Pi. The second line of the above text defines the path of the shared directory, which can be different in your case.
The third line of text makes the directory writeable, which means that we can add data to the directory, and if we don’t want other devices to add data to the shared directory, we can set it to no. The fourth and fifth lines of text will allow the devices to read, write, and execute files present in the directory.
The last line of text will secure the directory and ask for a password if a device wants to link with the shared directory. We can also set it to yes if we don’t want to secure the shared directory.
After adding the above text inside the configuration file, we can press CTRL+x then y and then ENTER from the keyboard to save it.
Create a User
We have to create a user which will be required to access the shared directory. We can use the below command to create a user ammar, which you can change according to your username.
sudo smbpasswd -a ammar
The above command will ask us to enter the user ammar password. The username and password will be required to link a device with the shared directory.
We also have to restart the Samba service so that the changes will be saved and Samba will start with new settings.
Now, we can connect with the shared folder from a different device using the address, username, and password we just created. Ensure the Raspberry Pi is connected to the same network as the other device through ethernet or WIFI.
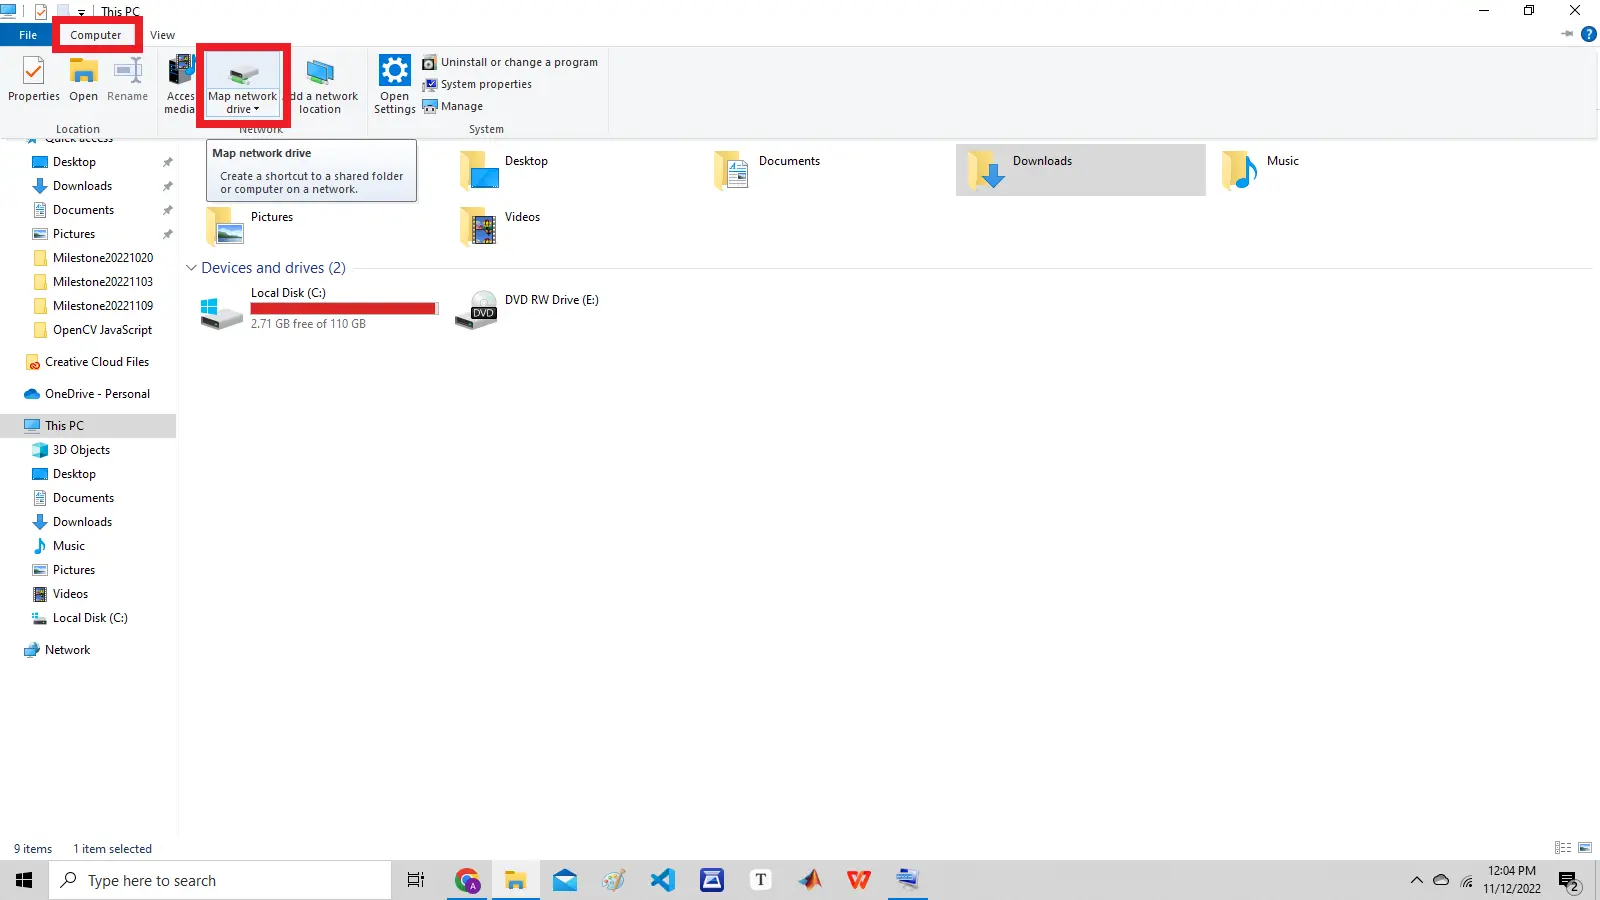
Connect to File Server on Windows
Now let’s discuss how we can connect to the file server we just created from a device running Windows. Make sure the device is connected to the same network as the Raspberry Pi.
To connect with the file server, we have to open the file explorer of Windows; then, we can click on the computer tab at the top-right corner and click on the map network drive, as shown below.
When we click on the map network drive, the below window will pop up.

We have to enter the IP address of our Raspberry Pi, which we can find using the hostname -I command on the terminal of Raspberry Pi, and we also have to add the shared name that we added as the first line in the configuration file of Samba.
After adding the address, we can press the finish button, and the below window will pop up.

We have to enter the user name and password that we created in the last step of Samba, and then we can press the ok button, and the folder will be listed on the This PC tab of Windows explorer as a hard drive along with other hard drives of the device.
Connect to File Server on Linux
Now let’s discuss how we can connect to the file server we just created from a device running Linux. Make sure the device is connected to the same network as the Raspberry Pi.
The procedure is quite the same as the procedure mentioned above. We have to open the Finder on Linux and then click on the Go tab listed at the top, and then we can click on the Connect to Server option mentioned at the end.
The remaining procedure will be the same as Windows. When asked to connect with the file server, we must add the address, username, and password.
After connecting with the file server, we can store, delete, and access files present in the shared directory. The file transfer speed depends on the bandwidth of the router that the two devices are connected with.
