在 C# 中設定客戶端-伺服器通訊

這個簡單的程式設計教程將討論客戶端-伺服器環境中的資料傳輸。它還將通過 TCP 套接字程式設計為客戶端-伺服器通訊模型提供基於 C# 的實現。
傳輸控制協議 (TCP)
開放系統互連 (OSI) 是一種廣泛採用的通訊參考模型,它解釋了計算機如何相互通訊。它確保無差錯的資料從一端傳送到另一端。
分層 OSI 模型定義了傳送或接收資料時要遵循的一些規則和協議。所有層都單獨工作,並執行從一端到另一端傳輸資料的任務。
本文將僅解釋傳輸層。該層使用的主要協議是傳輸控制協議(TCP),主要職責如下:
- 在兩端建立連線,然後在通訊結束時銷燬該連線。
- 資料傳輸包括以下任務:
- 確保資料可靠性並檢查資料是否按順序傳輸且無錯誤。
- 檢測錯誤(如果有)並重新傳送丟失的資料包。
- 控制資料包的流量和速率。
- 確認並設定標誌。
在 C# 中設定客戶端-伺服器通訊
讓我們轉向使用 C# 語言在 .NET 框架中實現客戶端/伺服器應用程式。我們將使用 Visual Studio Enterprise Edition 2019 進行此實施。
我們將建立兩個應用程式,一個用於客戶端,一個用於伺服器端。對於測試,這兩個應用程式都將駐留在同一臺計算機上。
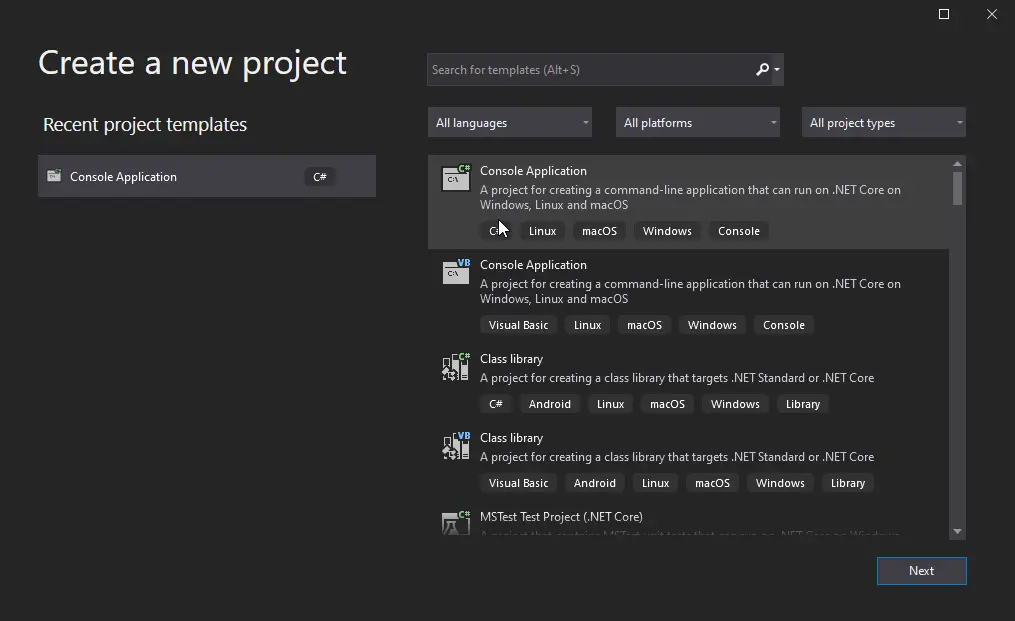
首先,我們將建立一個客戶端應用程式。為此,開啟 Visual Studio 並建立一個新專案。
然後,選擇專案型別 Console Application 並單擊 Next。

將專案名稱設為 Client Application,將解決方案名稱設為 ClientServerApplication。這將為客戶端建立一個新專案。

對於伺服器端程式設計,在同一解決方案中建立另一個專案:

這個專案將被命名為 ServerApplication 並且在同一個解決方案中。
建立專案後,你必須新增 Network Comms Dot Net 包檔案。為此,你需要使用 NuGet 控制檯安裝它們。
在影象中像這樣轉到工具> NuGet 包管理器>包管理器控制檯:

你將在視窗中看到包管理器控制檯,如上圖所示。在這個控制檯中,我們將編寫命令:
PM > Install - Package NetworkCommsDotNet - Version 3.0.3
在兩個專案中成功安裝包後,就可以開始編碼了。開啟 ServerApplication 專案並編寫程式碼:
public static void ConnectServer() {
  IPHostEntry myhost = Dns.GetHostEntry("localhost");
  IPAddress ipAddr = myhost.AddressList[0];
  IPEndPoint myEndPoint = new IPEndPoint(ipAddr, 11000);

  try {
    Socket listenerSocket = new Socket(ipAddr.AddressFamily, SocketType.Stream, ProtocolType.Tcp);

    listenerSocket.Bind(myEndPoint);
    listenerSocket.Listen(5);

    Console.WriteLine("Waiting for Client Socket to Coonect...");
    Socket socketHandler = listenerSocket.Accept();

    // data from the client.
    string myData = null;
    byte[] dataBytes = null;

    while (true) {
      dataBytes = new byte[1023];
      int bytesRece = socketHandler.Receive(dataBytes);
      myData += Encoding.ASCII.GetString(dataBytes, 0, bytesRece);

      if (myData.IndexOf("<EOF>") > -1) {
        myData = myData.Remove(myData.Length - 5);
        break;
      }
    }

    Console.WriteLine("Data Received from Client : {0}", myData);

    byte[] msg = Encoding.ASCII.GetBytes("This is the test msg from server");
    socketHandler.Send(msg);
    socketHandler.Shutdown(SocketShutdown.Both);
    socketHandler.Close();
  } catch (Exception e) {
    Console.WriteLine(e.ToString());
  }

  Console.WriteLine("\n Press any key to continue...");
  Console.ReadKey();
}
然後在客戶端,編寫以下程式碼:
public static void ConnectClient() {
  byte[] myBytes = new byte[1024];

  try {
    IPHostEntry myhost = Dns.GetHostEntry("localhost");
    IPAddress ipAddr = myhost.AddressList[0];
    IPEndPoint clientEP = new IPEndPoint(ipAddr, 11000);

    Socket senderSocket = new Socket(ipAddr.AddressFamily, SocketType.Stream, ProtocolType.Tcp);

    try {
      // Connect to the EndPoint
      senderSocket.Connect(clientEP);

      Console.WriteLine("Client Connect to Server at {0}", senderSocket.RemoteEndPoint.ToString());

      // Convert the string into a byte-type array.
      Console.WriteLine("Sending a test message");
      byte[] msg = Encoding.ASCII.GetBytes("This is a test message from Client<EOF>");

      // Send the data using the socket.
      int dataSent = senderSocket.Send(msg);

      // Receive the reply from the server device.
      int dataRec = senderSocket.Receive(myBytes);
      Console.WriteLine("Data Received from Server = {0}",
                        Encoding.ASCII.GetString(myBytes, 0, dataRec));

      // delete the socket
      senderSocket.Shutdown(SocketShutdown.Both);
      senderSocket.Close();
      Console.ReadKey();

    } catch (ArgumentNullException ane) {
      Console.WriteLine(ane.ToString());
    } catch (SocketException se) {
      Console.WriteLine(se.ToString());
    } catch (Exception e) {
      Console.WriteLine(e.ToString());
    }

  } catch (Exception e) {
    Console.WriteLine(e.ToString());
  }
}
在對應專案的 main 函式中呼叫這些函式後,需要構建專案,也可以構建整個解決方案。然後,為了執行輸出,導航到這些專案的檔案資源管理器並執行兩者的 exe 檔案。
收到以下輸出:

Husnain is a professional Software Engineer and a researcher who loves to learn, build, write, and teach. Having worked various jobs in the IT industry, he especially enjoys finding ways to express complex ideas in simple ways through his content. In his free time, Husnain unwinds by thinking about tech fiction to solve problems around him.
LinkedIn