React에서 여러 구성 요소 렌더링

React를 배우려는 대부분의 초보자는 일반적으로 한 가지에 대해 혼란스러워합니다. React에는 엄격한 규칙이 있습니다. 한 번의 호출로 여러 구성 요소를 렌더링할 수 없습니다.
혼동하지 마십시오. 수백 개의 구성 요소가 포함된 전체 구성 요소 트리를 렌더링할 수 있지만 모든 구성 요소에는 부모 요소가 하나만 있어야 합니다.
이 기사에서는 React에서 여러 구성 요소를 렌더링하는 가장 쉬운 방법을 보여주고자 합니다.
React에서 여러 구성 요소를 렌더링할 수 없는 이유
ReactDOM.render() 메서드는 이 메서드를 호출할 때마다 루트 컨테이너가 필요하기 때문에 한 번의 호출로 여러 구성 요소를 렌더링할 수 없습니다. 종종 그렇듯이 많은 구성 요소를 렌더링하려면 하나의 요소나 컨테이너에 모두 래핑해야 합니다.
<div>와 반응하여 여러 구성 요소 렌더링
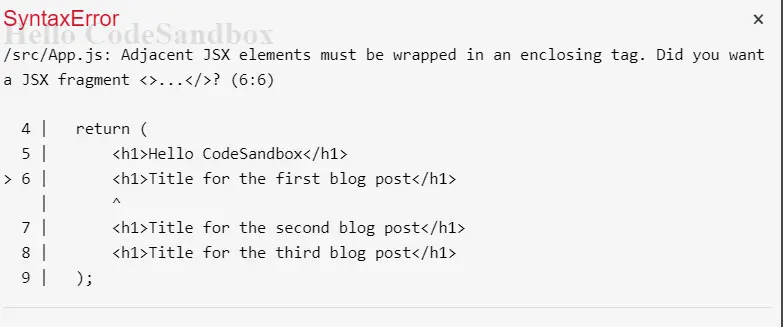
실제 예를 살펴보겠습니다. 여기에 몇 가지 헤더를 반환하는 App 구성 요소가 있습니다.
export default function App() {
  return (
      <h1>Hello CodeSandbox</h1>
      <h1>Title for the first blog post</h1>
      <h1>Title for the second blog post</h1>
      <h1>Title for the third blog post</h1>
  );
}
짐작할 수 있듯이 이 구성 요소는 SyntaxError를 생성합니다.

이것은 상당히 설명적입니다. 우리는 이러한 요소를 하나의 상위 요소로 래핑해야 한다는 것을 알고 있습니다.
해결책은 간단합니다. 모든 항목을 <div> HTML 요소로 래핑합니다.
export default function App() {
  return (
    <div>
      <h1>Hello CodeSandbox</h1>
      <h1>Title for the first blog post</h1>
      <h1>Title for the second blog post</h1>
      <h1>Title for the third blog post</h1>
    </div>
  );
}
라이브 CodeSandbox 데모를 보십시오. 모든 것이 제대로 작동합니다. 이제 <div>를 제거하면 오류가 다시 발생합니다.
프래그먼트와 반응하여 여러 구성 요소 렌더링
React v16.2를 사용하면 개발자는 React 조각을 사용하여 불필요하게 DOM 노드를 만들지 않고도 하나의 요소 아래에 자식을 그룹화할 수 있습니다.
구문은 간단합니다.
export default function App() {
  return (
    <React.Fragment>
      <h1>Hello CodeSandbox</h1>
      <h1>Title for the first blog post</h1>
      <h1>Title for the second blog post</h1>
      <h1>Title for the third blog post</h1>
    </React.Fragment>
  );
}
많은 사람들이 훨씬 더 편리한 속기 구문을 사용합니다.
export default function App() {
  return (
    <>
      <h1>Hello CodeSandbox</h1>
      <h1>Title for the first blog post</h1>
      <h1>Title for the second blog post</h1>
      <h1>Title for the third blog post</h1>
    </>
  );
}
이것은 새 <div> 래퍼를 만드는 것보다 훨씬 우아하고 효율적입니다.
Irakli is a writer who loves computers and helping people solve their technical problems. He lives in Georgia and enjoys spending time with animals.
LinkedIn