Angular の Google マップ

Google マップを紹介し、Angular アプリケーションで使用します。
Angular の Google マップ
Google マップは、ユーザーエクスペリエンスを向上させるために、ユーザーがウェブサイトを離れることなく現在地を見つけるのに役立つ最も簡単な方法です。
このチュートリアルでは、いくつかのライブラリが Google マップをアプリケーションに統合するのに役立ち、Angular Google Maps ライブラリについて説明します。
私たちのアプリケーションの 1つに Google マップを実装して、それを理解しましょう。したがって、新しい Angular アプリケーションを作成するには、ターミナルで次のコマンドを実行します。
# Terminal
ng new my-app
cd my-app
このコマンドは、新しい Angular プロジェクトを作成し、my-app プロジェクトディレクトリに移動します。
次に、CLI を使用して Angular Google Maps ライブラリをインポートします。
# angular
npm install @agm/core
Angular Google Maps ライブラリをインストールした後、それを app.module.ts ファイルにインポートする必要があります。
# angular
import { NgModule } from '@angular/core';
import { BrowserModule } from '@angular/platform-browser';
import { FormsModule } from '@angular/forms';

import { AppComponent } from './app.component';
import { HelloComponent } from './hello.component';
import { AgmCoreModule } from '@agm/core';

@NgModule({
  imports:      [
    BrowserModule,
    FormsModule,
    AgmCoreModule.forRoot({
      apiKey: 'xxx'
    })
  ],
  declarations: [ AppComponent, HelloComponent ],
  bootstrap:    [ AppComponent ]
})
export class AppModule { }
次に、app.component.ts ファイルで、経度と緯度の値を指定して、ページが読み込まれたときに表示されるマップの初期位置を定義します。また、ランダムな場所にマーカーを作成します。
マーカーを設定するには、経度、緯度、およびそのマーカーのラベルの 3つのパラメーターが必要です。最後に、これらのパラメーターに常に正しいタイプの値を配置するように、インターフェースを定義します。app.component.ts のコードは次のようになります。
# angular
import { Component } from '@angular/core';

@Component({
  selector: 'my-app',
  templateUrl: './app.component.html',
  styleUrls: ['./app.component.css'],
})
export class AppComponent {
  latitude: number = 51.5055676;
  longitude: number = -0.1326702;

  markers: marker[] = [
    {
      latitude: 51.5055676,
      longitude: -0.1326702,
      label: 'A',
    },
  ];
}

interface marker {
  latitude: number;
  longitude: number;
  label?: string;
}
それでは、設定を使用してマップを表示するためのテンプレートを作成しましょう。[zoomControl] を使用してズームコントロールを許可することもできます。
# angular
<h1>Google Maps With AGM</h1>

<agm-map
  [latitude]="latitude"
  [longitude]="longitude"
  [disableDefaultUI]="false"
  [zoomControl]="true">

  <agm-marker
      *ngFor="let a of markers; let b = index"
      [latitude]="a.latitude"
      [longitude]="a.longitude"
      [label]="a.label">

    <agm-info-window>
      <strong>Info Window! This is a random location</strong>
    </agm-info-window>

  </agm-marker>
</agm-map>
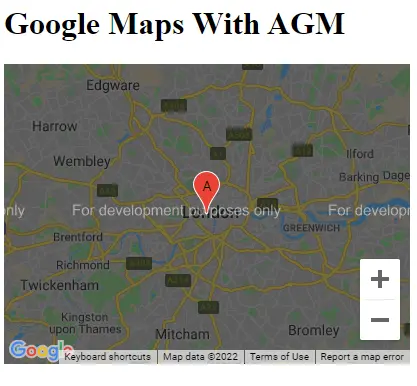
出力:

この簡単な方法で、複数のマーカーが付いた地図を簡単に表示できます。
Rana is a computer science graduate passionate about helping people to build and diagnose scalable web application problems and problems developers face across the full-stack.
LinkedIn