How to Configure React Component to Export Data to Excel
- Export React Data to Excel
- Example of a Component that Exports React Data to Excel
- Export Data from React to Excel - Simple Example
- Export Data from React to Excel - Advanced Example

React makes it very easy to receive and work with data from an API. Sometimes web applications can even collect user inputs and store them in the state.
Later you can display state values in your application, use them for dynamic features, or conditionally render (or skip rendering) certain elements. The point is that there are many use cases for state data in React.
One possible practical use case is to export state data to an Excel file.
Export React Data to Excel
The react-csv library provides the functionality to easily capture JavaScript data and export it as an Excel file. Data can be either from the state object or a normal array of objects.
To export data successfully, you must ensure that data follows a consistent format. Every object in the list (array) must have the same properties, or it will cause errors in the execution.
Structure of the Array
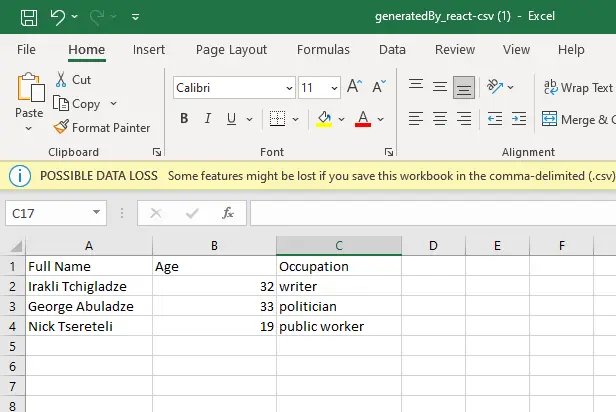
Within JavaScript, we format data as an array of arrays. The first array within the array will be used to generate column labels.
Arrays coming after that will be used to generate rows in the Excel file.
All arrays within the array must have the same number of values. As we already said, the first array will be used to generate columns.
The following arrays must have corresponding values at each position. Let’s look at this example.
[['Full Name', 'Age', 'Occupation'], ['Irakli Tchigladze', 32, 'writer'],
 ['George Abuladze', 33, 'politician'], ['Nick Tsereteli', 19, 'public worker']]
As you can see, the Full Name column comes first, Age second, and Occupation third. Values in the following arrays must have the same order.
That’s how the react-csv library assigns values to each column.
Example of a Component that Exports React Data to Excel
To better understand how the react-csv library works, let’s look at this web application that consists of a single component.
import "./styles.css";
import React from "react";
import { useState } from "react";
import { CSVLink } from "react-csv";

export default function App() {
  const [fullName, setFullName] = useState("");
  const [age, setAge] = useState(0);
  const [occupation, setOccupation] = useState("");
  const [data, setData] = useState([
    ["Full Name", "Age", "Occupation"],
    ["Irakli Tchigladze", 32, "writer"],
    ["George Abuladze", 33, "politician"],
    ["Nick Tsereteli", 19, "public worker"]
  ]);
  const handleSubmit = (e) => {
    setData([...data, [fullName, age, occupation]]);
    setFullName("");
    setAge(0);
    setOccupation("");
  };
  console.log(data);
  return (
    <div className="App">
      <CSVLink data={data}>Download Excel File</CSVLink>
      <form
        onSubmit={(e) => {
          e.preventDefault();
          handleSubmit();
        }}
      >
        <p>Full Name</p>
        <input
          type="text"
          value={fullName}
          onChange={(e) => setFullName(e.target.value)}
        />
        <p>Age</p>
        <input
          value={age}
          type="number"
          onChange={(e) => setAge(e.target.value)}
        />
        <p>Occupation</p>
        <input
          type="text"
          value={occupation}
          onChange={(e) => setOccupation(e.target.value)}
        />
        <p></p>
        <button type="submit">Submit data</button>
      </form>
    </div>
  );
}
We start by importing the useState hook, which we will use to generate state variables and update them. We also import the CSVLink custom component from the react-csv library.
Export Data from React to Excel - Simple Example
We use the useState() hook to initiate two state variables: data and setData. The latter is used to update the variable.
The argument to the useState() hook will be used as the default value for the data variable.
In JSX, we create a custom <CSVLink> component and set its data attribute equal to the state variable data. The web page will display a clickable text, Download Excel File.
Clicking this link will start a download in the browser. You’ll see data from the state variable if you open the file.

Go to this live CodeSandbox demo to try it yourself.
Export Data from React to Excel - Advanced Example
Web application on CodeSandbox does much more than allow you to download data in the state as an Excel file. It also allows you to update the state variable, which will be converted to Excel format.
On the live demo, you can enter values into the Full Name, Age, and Occupation fields, and click the Submit data button.
This will execute the handleSubmit() function, which will look at the current values of all three fields, create a new array, and add it to the existing state variable.
If you try downloading the file again, you will see that the values you entered into the fields will be the latest row in the Excel table.
The event handler also resets values you entered into fields.
Irakli is a writer who loves computers and helping people solve their technical problems. He lives in Georgia and enjoys spending time with animals.
LinkedIn