How to Convert Image to YUV Using OpenCV

YUV is a color model similar to the RGB and BGR image formats. In YUV, the component (Y) defines the luminance (brightness) of an image and the other two components, which are also known as the Chrominance components (U) and (V), define the blue projection and red projection, respectively.
In this article, we will see what YUV is and how to implement the YUV color model on an image using OpenCV.
YUV Color Model on an Image Using OpenCV
YUV encodes a color image or video concerning human perception and allows its reduced bandwidth for Chrominance components compared to a “direct” RGB representation. It is a model commonly used as part of a color image pipeline.
Historically, the terms YUV and Y′UV were used for a particular analog encoding of color information in television systems.
In the early stages, analog televisions used YUV color space to generate grayscale images/videos. Those analog TVs are used to eliminate the U and V components of YUV for producing black-and-white images/videos on screen.
The values of U and V range from -128 to +127 (for signed integers) and from 0 to +255 (for unsigned integers).
We will get a grayscale image if we remove the U and V components. U and V are color matrices.
Now let’s dive into the syntax and look at some examples.
Syntax:
cv2.cvtColor(img, cv2.COLOR_BGR2RGB)
Parameters:
img- The image is stored in the variableimgto be converted.cv2.COLOR_BGR2RGB- BGR image is converted to an RGB image.cv2.COLOR_RGB2YUV- RGB image is converted to YUV image.
Now that we have seen the syntax let’s see how it works and is implemented in OpenCV.
The good part about using OpenCV is that its specifically designed for computer vision and image processing applications, so it is good for performing various processing on an image.
Let’s understand how to use YUV in OpenCV with an example below.
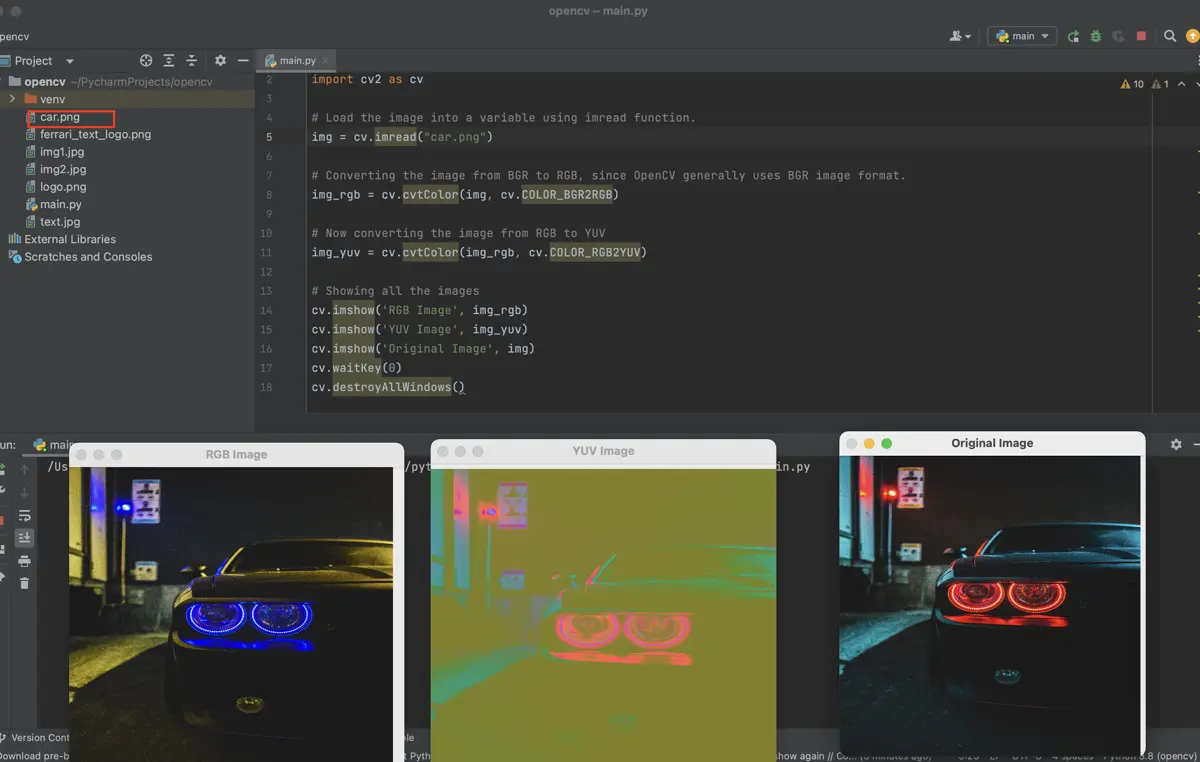
First, we must import the OpenCV module, load our image using the imread() function, and store it inside a variable called img. For this example, we have taken an image of a car in jpg format.
Code Snippet:
# Import opencv library
import cv2 as cv

# Load the image into a variable using the imread function.
img = cv.imread("car.png")

# Converting the image from BGR to RGB since OpenCV generally uses BGR image format.
img_rgb = cv.cvtColor(img, cv.COLOR_BGR2RGB)

# Now converting the image from RGB to YUV
img_yuv = cv.cvtColor(img_rgb, cv.COLOR_RGB2YUV)

# Showing all the images
cv.imshow("RGB Image", img_rgb)
cv.imshow("YUV Image", img_yuv)
cv.imshow("Original Image", img)
cv.waitKey(0)
cv.destroyAllWindows()
Then we convert the image using the cv.cvtcolor() method to change the color of the images to several parameters. As OpenCV uses BGR format for images, we need to convert this format to some other format.
So, now we will convert our original image from BGR to RGB format by passing the cv.COLOR_BGR2RGB to the second parameter of the cv.cvtcolor() method. As we want to convert our image to YUV, we will change the image from RGB format to YUV by passing the cv.COLOR_RGB2YUV parameter to the cv.cvtcolor() method.
Here, we can also pass the cv.COLOR_BGR2YUV parameter to directly perform a conversion from the BGR image to YUV. We are doing a long way to better understand RGB and YUV.
For more information, visit the official docs.
Lastly, we will use the imshow() function to show all the images on the screen.
Output:

Conclusion
As mentioned earlier, the problem with RGB is that it is appalling for mapping visual perception, but YUV is more efficient than RGB for this purpose. So that’s why we use YUV because of its vital component, luminance.
Therefore, using the above ways, we can convert the images to YUV and back with and without using OpenCV.
Sahil is a full-stack developer who loves to build software. He likes to share his knowledge by writing technical articles and helping clients by working with them as freelance software engineer and technical writer on Upwork.
LinkedIn