OpenCV Histogram Equalization
- Method 1: Applying Histogram Equalization to Each Channel
- Method 2: Using CLAHE for Local Histogram Equalization
- Conclusion
- FAQ
Histogram equalization is a powerful technique in image processing that enhances the contrast of an image by redistributing its intensity values. This method is especially useful for improving the visibility of features in images that are too dark or too bright.
In this article, we will explore how to perform histogram equalization on colored images using the equalizeHist() function from OpenCV. By the end of this guide, you will have a solid understanding of how to apply this technique to your own projects, making your images more vibrant and visually appealing.
Before diving into the code, it’s essential to grasp what histogram equalization entails. Essentially, it involves transforming the pixel intensity distribution of an image to achieve a uniform histogram. This transformation enhances the global contrast, making it easier to identify features within the image. The equalizeHist() function in OpenCV is designed to work with grayscale images, but we can still apply it to colored images by processing each channel separately.
Method 1: Applying Histogram Equalization to Each Channel
To enhance a colored image, we can split it into its three color channels (Red, Green, and Blue), apply histogram equalization to each channel individually, and then merge them back together. This method ensures that the color balance remains intact while improving the image’s overall contrast.
Here’s how you can do it:
import cv2

# Load the colored image
image = cv2.imread('path_to_image.jpg')

# Split the image into its color channels
b, g, r = cv2.split(image)

# Apply histogram equalization to each channel
b_eq = cv2.equalizeHist(b)
g_eq = cv2.equalizeHist(g)
r_eq = cv2.equalizeHist(r)

# Merge the equalized channels back together
equalized_image = cv2.merge((b_eq, g_eq, r_eq))

# Save the equalized image
cv2.imwrite('equalized_image.jpg', equalized_image)
Output:
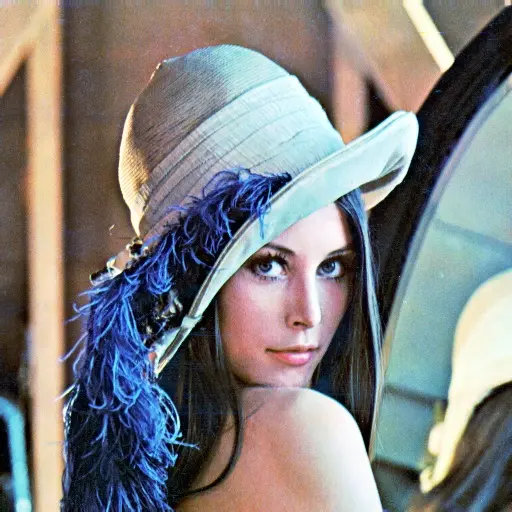
This method begins by loading the image and splitting it into its blue, green, and red channels. The equalizeHist() function is then applied to each channel separately, enhancing the contrast of each color component. Finally, the equalized channels are merged back into a single image. This approach allows for better visibility of details without altering the color balance, thus maintaining the image’s natural appearance.
Method 2: Using CLAHE for Local Histogram Equalization
While the standard histogram equalization can significantly enhance image contrast, it sometimes leads to over-enhancement, resulting in unnatural colors or noise. Contrast Limited Adaptive Histogram Equalization (CLAHE) is an advanced method that addresses this issue by applying histogram equalization to small regions of the image, rather than the whole image. This technique helps in preserving local contrast and avoiding noise amplification.
Here’s how to implement CLAHE in OpenCV:
import cv2

# Load the colored image
image = cv2.imread('path_to_image.jpg')

# Convert the image to YUV color space
yuv_image = cv2.cvtColor(image, cv2.COLOR_BGR2YUV)

# Create a CLAHE object
clahe = cv2.createCLAHE(clipLimit=3.0, tileGridSize=(8, 8))

# Apply CLAHE to the Y channel
yuv_image[:,:,0] = clahe.apply(yuv_image[:,:,0])

# Convert back to BGR color space
equalized_image = cv2.cvtColor(yuv_image, cv2.COLOR_YUV2BGR)

# Save the equalized image
cv2.imwrite('clahe_equalized_image.jpg', equalized_image)
Output:
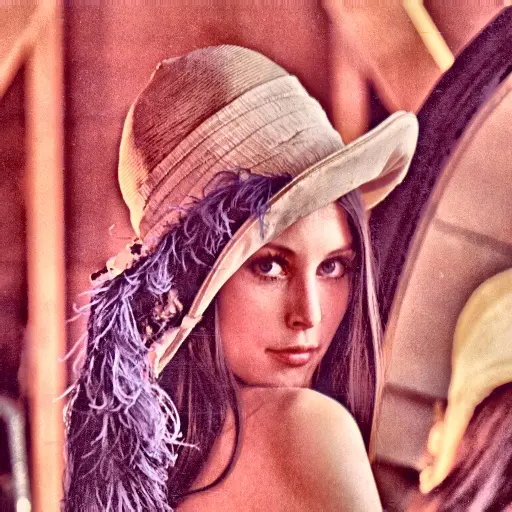
In this method, we first convert the image from the BGR color space to YUV. The Y channel represents the brightness, while the U and V channels represent color information. We then create a CLAHE object and apply it to the Y channel, enhancing the brightness locally. After processing, we convert the image back to the BGR color space. This method provides a more refined enhancement, making it particularly useful for images with varying lighting conditions.
Conclusion
Histogram equalization is a valuable technique for improving the contrast of images, making them more visually appealing and easier to analyze. Whether you choose to apply traditional histogram equalization to each color channel or opt for the more sophisticated CLAHE method, OpenCV provides the tools you need to enhance your images effectively. By mastering these techniques, you can significantly elevate the quality of your visual content, making it stand out in any project.
FAQ
- What is histogram equalization?
Histogram equalization is a technique used in image processing to enhance the contrast of images by redistributing the intensity values.
-
Can I apply histogram equalization to colored images?
Yes, you can apply histogram equalization to colored images by processing each color channel separately. -
What is CLAHE?
CLAHE stands for Contrast Limited Adaptive Histogram Equalization, which enhances local contrast while avoiding noise amplification. -
How does histogram equalization work?
Histogram equalization works by transforming the pixel intensity distribution of an image to achieve a more uniform histogram, improving visibility. -
What are the benefits of using CLAHE over standard histogram equalization?
CLAHE preserves local contrast and minimizes noise amplification, making it ideal for images with varying lighting conditions.
