How to Set Border of Tkinter Label Widget
- Understanding the Tkinter Label Widget
- Setting the Border with borderwidth Option
- Combining borderwidth with Relief Styles
- Customizing Colors and Backgrounds
- Conclusion
- FAQ
Creating visually appealing applications with Python’s Tkinter library is an essential skill for developers. One of the key components in Tkinter is the Label widget, which is often used to display text or images. However, to enhance the aesthetics of your application, you may want to customize the appearance of the Label widget, particularly its border.
In this tutorial, we will explore how to set the border of a Tkinter Label widget by utilizing the borderwidth option. Whether you’re a beginner or an experienced developer, this guide will help you understand how to manipulate the border properties effectively.
Understanding the Tkinter Label Widget
Before diving into how to set the border, it’s crucial to understand what the Tkinter Label widget is. The Label widget is a versatile tool used to display text or images in a Tkinter application. It can be configured with various options, including font style, color, and, of course, border properties. The borderwidth option allows you to specify the thickness of the border around the Label, giving you control over its visual presentation.
To set the border, you typically combine the borderwidth option with the relief option, which determines the style of the border. The available styles include flat, raised, sunken, groove, and ridge. By mastering these options, you can create a polished look for your application.
Setting the Border with borderwidth Option
The borderwidth option is straightforward to use. It allows you to define how thick you want the border to be. Here’s a simple example demonstrating how to set the border of a Tkinter Label widget.
import tkinter as tk

root = tk.Tk()
root.title("Tkinter Label Border Example")

label = tk.Label(root, text="Hello, Tkinter!", borderwidth=5, relief="groove")
label.pack(padx=20, pady=20)

root.mainloop()
Output:
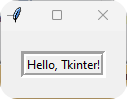
In this example, we start by importing the Tkinter module and creating a main application window. We then create a Label widget with the text “Hello, Tkinter!” and set its borderwidth to 5. The relief option is set to “groove,” which gives the border a stylish, sunken appearance. Finally, we pack the label into the window with some padding for better aesthetics.
Using the borderwidth option allows for significant customization of the Label widget, making it stand out in your application. You can experiment with different values and relief styles to find the perfect combination for your design.
Combining borderwidth with Relief Styles
While setting a border width is essential, combining it with different relief styles can enhance the overall design of your Label widget. Let’s take a look at how different relief styles can change the appearance of your label.
import tkinter as tk

root = tk.Tk()
root.title("Tkinter Label Border Styles")

label1 = tk.Label(root, text="Flat Border", borderwidth=2, relief="flat")
label1.pack(padx=10, pady=10)

label2 = tk.Label(root, text="Raised Border", borderwidth=5, relief="raised")
label2.pack(padx=10, pady=10)

label3 = tk.Label(root, text="Sunken Border", borderwidth=5, relief="sunken")
label3.pack(padx=10, pady=10)

label4 = tk.Label(root, text="Ridge Border", borderwidth=5, relief="ridge")
label4.pack(padx=10, pady=10)

label5 = tk.Label(root, text="Groove Border", borderwidth=5, relief="groove")
label5.pack(padx=10, pady=10)

root.mainloop()
Output:
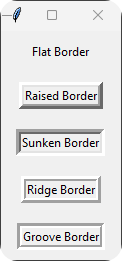
In this example, we create five different Label widgets, each demonstrating a unique relief style. The borderwidth option is varied across the labels to show how thickness can affect the appearance. Each label is packed with padding to ensure they are visually separated.
By experimenting with various combinations of borderwidth and relief styles, you can create a more dynamic user interface. This flexibility allows you to tailor the design to match the overall theme of your application.
Customizing Colors and Backgrounds
In addition to setting the border width and style, customizing colors can significantly enhance the look of your Label widget. By adjusting the bg (background) and fg (foreground) options, you can create a cohesive design that aligns with your application’s color scheme.
import tkinter as tk

root = tk.Tk()
root.title("Tkinter Label Color Customization")

label = tk.Label(root, text="Colorful Label", borderwidth=3, relief="solid", bg="lightblue", fg="darkblue")
label.pack(padx=20, pady=20)

root.mainloop()
Output:
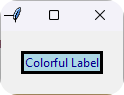
In this example, we create a Label widget with a solid border. The bg option is set to “lightblue,” while the fg option is set to “darkblue.” This combination creates a visually appealing label that stands out.
Customizing the colors of your Label widget allows you to create a more engaging user experience. By using contrasting colors, you can draw attention to important information or simply make your application more visually attractive.
Conclusion
Setting the border of a Tkinter Label widget is a simple yet effective way to enhance the visual appeal of your application. By utilizing the borderwidth option in combination with various relief styles and color customizations, you can create a polished and professional-looking user interface. Experimenting with these options not only helps you understand Tkinter better but also allows you to express your creativity. Whether you are building a simple application or a complex one, mastering these techniques will undoubtedly elevate your development skills.
FAQ
-
How do I change the border style of a Tkinter Label?
You can change the border style of a Tkinter Label by using thereliefoption along withborderwidth. -
Can I use images in a Tkinter Label?
Yes, you can use images in a Tkinter Label by specifying theimageoption and providing a PhotoImage object. -
What are the available relief styles for Tkinter Labels?
The available relief styles include flat, raised, sunken, groove, and ridge. -
How can I customize the font of a Tkinter Label?
You can customize the font of a Tkinter Label by using thefontoption and providing a font tuple. -
Is it possible to change the border color of a Tkinter Label?
Tkinter does not have a direct option to change the border color, but you can achieve a similar effect by using thehighlightbackgroundandhighlightcoloroptions.

Founder of DelftStack.com. Jinku has worked in the robotics and automotive industries for over 8 years. He sharpened his coding skills when he needed to do the automatic testing, data collection from remote servers and report creation from the endurance test. He is from an electrical/electronics engineering background but has expanded his interest to embedded electronics, embedded programming and front-/back-end programming.
LinkedIn Facebook