How to Change Tkinter Button State
-
Method 1: Using the
config()Method -
Method 2: Using the
stateAttribute - Method 3: Using Button States with Conditions
- Conclusion
- FAQ
Tkinter is a powerful toolkit for creating graphical user interfaces (GUIs) in Python. One of the essential components of any GUI is the button, which can be used to trigger actions or events. However, there may be times when you want to change the state of a button from enabled to disabled or vice versa.
This tutorial will guide you through the process of changing the Tkinter button state, providing clear examples and explanations to help you understand the underlying concepts. Whether you’re building a simple application or a more complex interface, knowing how to manipulate button states can enhance user experience and functionality.
In Tkinter, buttons can exist in three primary states: normal, active, and disabled. The normal state allows users to click the button, the active state visually indicates that the button is being pressed, and the disabled state prevents any interaction with the button. Changing these states dynamically can significantly improve the interactivity of your application. Here, we will focus on how to toggle between the normal and disabled states.
Method 1: Using the config() Method
One of the simplest ways to change a Tkinter button’s state is by using the config() method. This method allows you to modify the properties of your button, including its state. Below is a straightforward example demonstrating how to toggle the button state from normal to disabled and back again.
import tkinter as tk

def toggle_button():
    if button['state'] == 'normal':
        button.config(state='disabled')
    else:
        button.config(state='normal')

root = tk.Tk()
button = tk.Button(root, text='Click Me', command=toggle_button)
button.pack(pady=20)

root.mainloop()
Output:
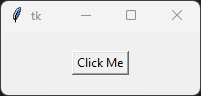
In this example, we define a function called toggle_button that checks the current state of the button. If the button is in the normal state, it changes to disabled; if it is disabled, it reverts to normal. The config() method is essential here, as it allows us to update the button’s state dynamically. With each click, the button’s state toggles, providing immediate feedback to the user.
Method 2: Using the state Attribute
Another method to change the state of a button in Tkinter is by directly manipulating the state attribute. This approach is slightly more straightforward and can be useful in scenarios where you want to set the button state without calling the config() method explicitly. Below is an example that illustrates this technique.
import tkinter as tk

def disable_button():
    button['state'] = 'disabled'

def enable_button():
    button['state'] = 'normal'

root = tk.Tk()
button = tk.Button(root, text='Disable', command=disable_button)
button.pack(pady=20)

enable_button_button = tk.Button(root, text='Enable', command=enable_button)
enable_button_button.pack(pady=20)

root.mainloop()
Output:
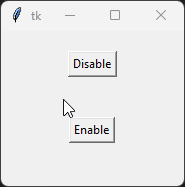
In this code snippet, we have two functions: disable_button and enable_button. The first function sets the button’s state to ‘disabled’, while the second function changes it back to ’normal’. We create two buttons within the main application window: one to disable the first button and another to enable it again. This method provides a clear and effective way to manage button states without needing to call the config() method.
Method 3: Using Button States with Conditions
Sometimes, you may want to manage button states based on specific conditions or events in your application. This method allows for greater flexibility and control over the button’s behavior. Below is an example that demonstrates how to use conditions to manage the button state effectively.
import tkinter as tk

def check_condition():
    if entry.get() == "disable":
        button.config(state='disabled')
    else:
        button.config(state='normal')

root = tk.Tk()
entry = tk.Entry(root)
entry.pack(pady=20)

button = tk.Button(root, text='I am a Button', command=check_condition)
button.pack(pady=20)

root.mainloop()
Output:
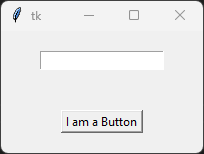
In this example, we create an entry box where the user can type text. The check_condition function checks the content of the entry box. If the user types “disable”, the button becomes disabled; otherwise, it remains enabled. This approach allows you to create dynamic interfaces that respond to user input, enhancing the overall user experience.
Conclusion
Changing the state of a Tkinter button is a fundamental skill for creating interactive applications. By using methods like config(), manipulating the state attribute directly, or implementing conditions, you can effectively manage button states in your GUI. Understanding these techniques will not only improve your coding skills but also enhance the usability of your applications. Whether you’re a beginner or an experienced developer, mastering button states in Tkinter is a valuable addition to your toolkit.
FAQ
-
How can I disable a button in Tkinter?
You can disable a button in Tkinter by using theconfig()method with the state set to ‘disabled’ or by directly assigning ‘disabled’ to the button’s state attribute. -
Can I enable a button again after disabling it?
Yes, you can enable a button again by setting its state back to ’normal’ using the same methods mentioned above. -
Is it possible to change the button state based on user input?
Absolutely! You can use conditions to change the button state based on user input, such as text entered in an entry box. -
What other states can a Tkinter button have?
Besides normal and disabled, a Tkinter button can also have an active state, which indicates that the button is currently being pressed. -
Are there any limitations to changing button states in Tkinter?
No, you can freely change the button states as needed in your application, but keep in mind that frequent changes might confuse users.

Founder of DelftStack.com. Jinku has worked in the robotics and automotive industries for over 8 years. He sharpened his coding skills when he needed to do the automatic testing, data collection from remote servers and report creation from the endurance test. He is from an electrical/electronics engineering background but has expanded his interest to embedded electronics, embedded programming and front-/back-end programming.
LinkedIn Facebook