How to Create 3D Graphics in PyGame
- Setting Up Your Environment
- Creating a Basic 3D Cube
- Implementing Textures on 3D Objects
- Adding Lighting Effects
- Conclusion
- FAQ
Creating 3D graphics in PyGame may seem like a daunting task, especially since PyGame is primarily known for its 2D capabilities. However, with the right techniques and libraries, you can bring a third dimension to your PyGame projects. By leveraging libraries such as PyOpenGL and using some clever coding techniques, you can create stunning 3D visuals.
In this article, we’ll explore how to set up your environment, utilize these libraries, and implement basic 3D graphics in PyGame. Whether you’re a beginner or an experienced developer, this guide will help you navigate the world of 3D graphics in PyGame.
Setting Up Your Environment
Before diving into 3D graphics, you need to set up your development environment. First, ensure you have Python and PyGame installed. If you haven’t installed PyGame yet, you can do so via pip:
pip install pygame
Next, you’ll need to install PyOpenGL, which is essential for creating 3D graphics. You can install it using pip as well:
pip install PyOpenGL PyOpenGL_accelerate
Once you have these libraries installed, you’re ready to start coding. The combination of PyGame and PyOpenGL allows you to create a window for rendering 3D objects while managing user input and other game functionalities.
Creating a Basic 3D Cube
One of the simplest ways to get started with 3D graphics is by creating a basic cube. Here’s a sample code that demonstrates how to do this:
import pygame
from OpenGL.GL import *
from OpenGL.GLU import *

vertices = [
    (1, -1, -1),
    (1, 1, -1),
    (-1, 1, -1),
    (-1, -1, -1),
    (1, -1, 1),
    (1, 1, 1),
    (-1, -1, 1),
    (-1, 1, 1),
]

edges = [
    (0, 1),
    (1, 2),
    (2, 3),
    (3, 0),
    (4, 5),
    (5, 6),
    (6, 7),
    (7, 4),
    (0, 4),
    (1, 5),
    (2, 6),
    (3, 7),
]

def draw_cube():
    glBegin(GL_LINES)
    for edge in edges:
        for vertex in edge:
            glVertex3fv(vertices[vertex])
    glEnd()

def main():
    pygame.init()
    display = (800, 600)
    pygame.display.set_mode(display, pygame.DOUBLEBUF | pygame.OPENGL)
    gluPerspective(45, (display[0] / display[1]), 0.1, 50.0)
    glTranslatef(0.0, 0.0, -5)

    while True:
        for event in pygame.event.get():
            if event.type == pygame.QUIT:
                pygame.quit()
                return

        glRotatef(1, 0, 1, 0)
        glClear(GL_COLOR_BUFFER_BIT | GL_DEPTH_BUFFER_BIT)
        draw_cube()
        pygame.display.flip()
        pygame.time.wait(10)

main()
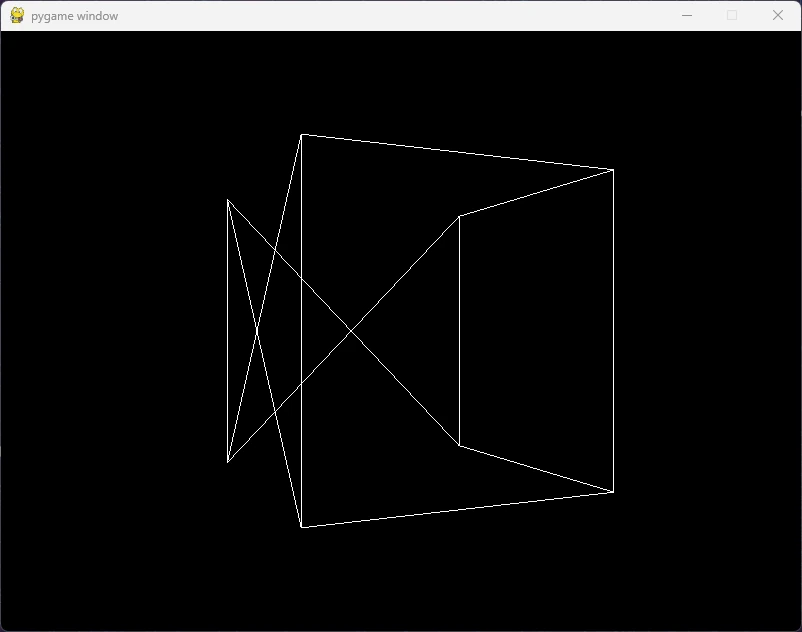
This code sets up a basic PyGame window and uses PyOpenGL to render a 3D cube. The vertices define the corners of the cube, while the edges connect those vertices to form the shape. In the main loop, we handle events, apply rotation to the cube, and refresh the display. The gluPerspective function is used to create a perspective view, which makes the cube appear three-dimensional.
Implementing Textures on 3D Objects
Adding textures to your 3D objects can significantly enhance their visual appeal. Here’s how to apply a texture to the cube we created earlier.
First, you need to load an image that will serve as the texture. Ensure the image is in the same directory as your script. Here’s the updated code:
import pygame
from OpenGL.GL import *
from OpenGL.GLU import *

vertices = [
    (1, -1, -1),
    (1, 1, -1),
    (-1, 1, -1),
    (-1, -1, -1),
    (1, -1, 1),
    (1, 1, 1),
    (-1, -1, 1),
    (-1, 1, 1),
]

edges = [
    (0, 1),
    (1, 2),
    (2, 3),
    (3, 0),
    (4, 5),
    (5, 6),
    (6, 7),
    (7, 4),
    (0, 4),
    (1, 5),
    (2, 6),
    (3, 7),
]

surfaces = [
    (0, 1, 2, 3),
    (3, 2, 7, 6),
    (6, 5, 1, 2),
    (5, 4, 0, 1),
    (4, 5, 6, 7),
    (4, 0, 3, 7),
]

texture = None

def load_texture():
    global texture
    texture = glGenTextures(1)
    image = pygame.image.load('texture.jpg')
    image = pygame.transform.flip(image, False, True)
    tex_data = pygame.image.tostring(image, "RGBA", True)
    glBindTexture(GL_TEXTURE_2D, texture)
    glTexParameteri(GL_TEXTURE_2D, GL_TEXTURE_WRAP_S, GL_REPEAT)
    glTexParameteri(GL_TEXTURE_2D, GL_TEXTURE_WRAP_T, GL_REPEAT)
    glTexParameteri(GL_TEXTURE_2D, GL_TEXTURE_MAG_FILTER, GL_LINEAR)
    glTexParameteri(GL_TEXTURE_2D, GL_TEXTURE_MIN_FILTER, GL_LINEAR)
    glTexImage2D(GL_TEXTURE_2D, 0, GL_RGBA, image.get_width(), image.get_height(), 0, GL_RGBA, GL_UNSIGNED_BYTE, tex_data)

def draw_cube():
    glBegin(GL_QUADS)
    for surface in surfaces:
        for vertex in surface:
            glTexCoord2fv((vertex % 2, vertex // 2))
            glVertex3fv(vertices[vertex])
    glEnd()

def main():
    pygame.init()
    display = (800, 600)
    pygame.display.set_mode(display, pygame.DOUBLEBUF | pygame.OPENGL)
    gluPerspective(45, (display[0] / display[1]), 0.1, 50.0)
    glTranslatef(0.0, 0.0, -5)
    load_texture()

    while True:
        for event in pygame.event.get():
            if event.type == pygame.QUIT:
                pygame.quit()
                return

        glRotatef(1, 0, 1, 0)
        glClear(GL_COLOR_BUFFER_BIT | GL_DEPTH_BUFFER_BIT)
        draw_cube()
        pygame.display.flip()
        pygame.time.wait(10)

main()
Output:
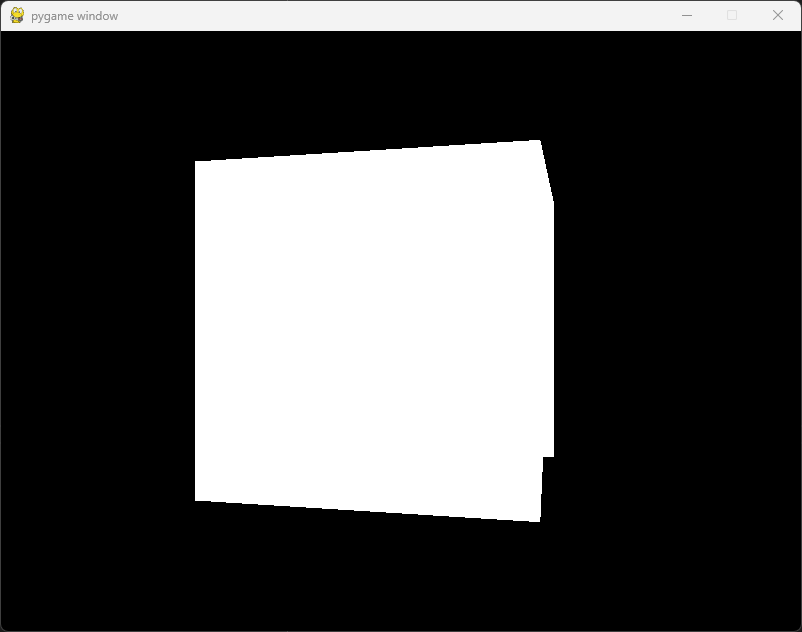
In this code, we added a function called load_texture that loads an image and binds it as a texture for the cube. The draw_cube function now uses texture coordinates to map the texture onto the cube’s surfaces. This enhancement not only makes the cube visually appealing but also demonstrates how texture mapping works in 3D graphics.
Adding Lighting Effects
To make your 3D graphics even more realistic, you can implement lighting effects. Here’s how to add basic lighting to your 3D cube:
import pygame
from OpenGL.GL import *
from OpenGL.GLU import *

vertices = [
    (1, -1, -1),
    (1, 1, -1),
    (-1, 1, -1),
    (-1, -1, -1),
    (1, -1, 1),
    (1, 1, 1),
    (-1, -1, 1),
    (-1, 1, 1),
]

edges = [
    (0, 1),
    (1, 2),
    (2, 3),
    (3, 0),
    (4, 5),
    (5, 6),
    (6, 7),
    (7, 4),
    (0, 4),
    (1, 5),
    (2, 6),
    (3, 7),
]

def draw_cube():
    glBegin(GL_LINES)
    for edge in edges:
        for vertex in edge:
            glVertex3fv(vertices[vertex])
    glEnd()

def main():
    pygame.init()
    display = (800, 600)
    pygame.display.set_mode(display, pygame.DOUBLEBUF | pygame.OPENGL)
    gluPerspective(45, (display[0] / display[1]), 0.1, 50.0)
    glTranslatef(0.0, 0.0, -5)

    glEnable(GL_LIGHTING)
    glEnable(GL_LIGHT0)
    glEnable(GL_DEPTH_TEST)

    glLightfv(GL_LIGHT0, GL_POSITION, (1, 1, 1, 0))
    glLightfv(GL_LIGHT0, GL_DIFFUSE, (1, 1, 1, 1))

    while True:
        for event in pygame.event.get():
            if event.type == pygame.QUIT:
                pygame.quit()
                return

        glRotatef(1, 0, 1, 0)
        glClear(GL_COLOR_BUFFER_BIT | GL_DEPTH_BUFFER_BIT)
        draw_cube()
        pygame.display.flip()
        pygame.time.wait(10)

main()
Output:

In this code, we enabled lighting in the OpenGL context. We set up a light source with a specific position and diffuse color. The cube now appears illuminated, which adds depth and realism to the scene. You can experiment with different light positions and colors to achieve various effects.
Conclusion
Creating 3D graphics in PyGame is not only possible but also an exciting way to enhance your game development skills. By using libraries like PyOpenGL, you can easily implement 3D shapes, textures, and lighting effects. This article covered the essential steps to get you started, from setting up your environment to creating and enhancing a simple 3D cube. As you become more comfortable with these concepts, consider exploring more complex 3D models and animations. The world of 3D graphics is vast, and with PyGame, you have the tools to bring your creative visions to life.
FAQ
-
Is PyGame suitable for creating 3D games?
PyGame is primarily designed for 2D games, but with the help of PyOpenGL, you can create 3D graphics. -
Do I need to learn OpenGL to create 3D graphics in PyGame?
While it’s beneficial to understand OpenGL, you can start with basic examples and gradually learn more as you progress. -
Can I use other libraries with PyGame for 3D graphics?
Yes, you can explore libraries like Panda3D or Blender for more advanced 3D capabilities. -
What kind of 3D models can I create in PyGame?
You can create basic shapes like cubes and spheres or import more complex models using appropriate file formats. -
Are there any performance issues when using 3D graphics in PyGame?
Performance can vary based on the complexity of your graphics and the capabilities of the hardware running the game.

Hi, my name is Maxim Maeder, I am a young programming enthusiast looking to have fun coding and teaching you some things about programming.
GitHub