How to Use Hover in jQuery
- Understanding the .hover() Method
- Creating a Tooltip with .hover()
- Using .hover() for Animations
- Best Practices for Using .hover() in jQuery
- Conclusion
- FAQ
In today’s post, we will learn about using the .hover() event in jQuery. The .hover() method is a powerful feature that allows developers to create dynamic and interactive user experiences on their websites. By triggering specific actions when users hover over elements, you can enhance the visual appeal of your site and engage visitors more effectively. Whether you’re looking to change styles, display additional information, or create animations, understanding how to use the .hover() method is essential for modern web development. Let’s dive into the details of how to implement this feature in your projects!
Understanding the .hover() Method
The .hover() method in jQuery is a shorthand for two event handlers: mouseenter and mouseleave. This method allows you to specify what should happen when the mouse pointer enters or leaves an element. You can use it to change styles, show or hide elements, or trigger animations.
Here’s a simple example demonstrating how to change the background color of a div when you hover over it:
$(document).ready(function() {
    $("#myDiv").hover(
        function() {
            $(this).css("background-color", "yellow");
        },
        function() {
            $(this).css("background-color", "white");
        }
    );
});
In this code, when you hover over the div with the ID “myDiv,” its background color changes to yellow. When you move the mouse away, it reverts to white. This basic interaction can be expanded upon to create more complex behaviors.
Output:
The .hover() method is particularly useful for creating responsive designs that react to user actions. By incorporating it, you can make your website more engaging and user-friendly.
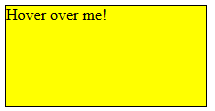
Creating a Tooltip with .hover()
Another interesting application of the .hover() method is creating tooltips. Tooltips are small informational boxes that appear when a user hovers over an element. They can provide additional context or details without cluttering the interface.
Here’s how you can create a simple tooltip using jQuery:
<div id="tooltip" style="display:none; position:absolute; background-color:grey; color:white; padding:5px;">
    This is a tooltip!
</div>
<div id="hoverElement" style="width:100px; height:100px; background-color:blue;">
    Hover over me!
</div>

<script>
$(document).ready(function() {
    $("#hoverElement").hover(
        function(event) {
            $("#tooltip").css({top: event.pageY + 5, left: event.pageX + 5}).fadeIn();
        },
        function() {
            $("#tooltip").fadeOut();
        }
    );
});
</script>
In this example, when you hover over the blue box, a tooltip appears near the mouse cursor. The tooltip’s position is dynamically set based on the mouse’s coordinates, ensuring it doesn’t obstruct the element being hovered over.
This method enhances user experience by providing context-sensitive information, making your website more intuitive and user-friendly.
Using .hover() for Animations
You can also utilize the .hover() method to create animations, enhancing the visual appeal of your website. By combining .hover() with jQuery’s animation methods, you can create smooth transitions that attract user attention.
Here’s an example that animates the size of an element on hover:
$(document).ready(function() {
    $("#animateDiv").hover(
        function() {
            $(this).animate({width: "200px", height: "200px"}, 300);
        },
        function() {
            $(this).animate({width: "100px", height: "100px"}, 300);
        }
    );
});
In this code, when the user hovers over the div with ID “animateDiv,” it expands to 200x200 pixels. When the mouse leaves, it returns to its original size of 100x100 pixels. This creates a visually appealing effect that can draw attention to specific parts of your website.
Output:
The div expands to 200x200 pixels on hover and shrinks back to 100x100 pixels when the mouse leaves.
Using animations with the .hover() method can significantly enhance user engagement, making your site more interactive and enjoyable to navigate.
Best Practices for Using .hover() in jQuery
While the .hover() method is a fantastic tool, it’s essential to use it wisely to avoid overwhelming users. Here are some best practices to consider:
-
Keep it Simple: Avoid overly complex hover effects that can confuse users. Simple color changes or subtle animations usually work best.
-
Accessibility: Ensure that hover effects are accessible to all users, including those who navigate using keyboards or screen readers.
-
Performance: Overuse of animations can lead to performance issues, especially on mobile devices. Test your site’s performance and optimize where necessary.
-
Mobile Considerations: Remember that hover effects don’t translate well to touch devices. Consider alternative interactions for mobile users.
By following these best practices, you can create an engaging and user-friendly experience that enhances your website’s overall usability.
Conclusion
In conclusion, mastering the .hover() method in jQuery can significantly enhance your web development skills. From changing styles to creating tooltips and animations, this versatile method offers numerous possibilities for improving user interaction. By applying the techniques discussed in this article, you can create a more engaging and dynamic website that captures your visitors’ attention. Remember to keep your designs simple and accessible, ensuring a seamless experience for all users. Start experimenting with the .hover() method today and see how it can transform your web projects!
FAQ
-
What is the .hover() method in jQuery?
The .hover() method in jQuery is used to define actions that occur when a user hovers over an element, allowing for dynamic interactions. -
Can I use .hover() for mobile devices?
Hover effects do not work on touch devices, so consider alternative interactions, such as click events, for mobile users. -
How do I create a tooltip using jQuery?
You can create a tooltip by using the .hover() method to show and hide an element containing the tooltip text. -
Is it possible to animate elements with .hover()?
Yes, you can combine the .hover() method with jQuery’s animate() function to create engaging animations on hover. -
What are some best practices for using .hover()?
Keep hover effects simple, ensure accessibility, monitor performance, and consider mobile usability when implementing hover interactions.

Shraddha is a JavaScript nerd that utilises it for everything from experimenting to assisting individuals and businesses with day-to-day operations and business growth. She is a writer, chef, and computer programmer. As a senior MEAN/MERN stack developer and project manager with more than 4 years of experience in this sector, she now handles multiple projects. She has been producing technical writing for at least a year and a half. She enjoys coming up with fresh, innovative ideas.
LinkedIn