How to Add ID to an HTML Element in JavaScript
- Understanding the Element.id Property
- Method 1: Setting an ID Using JavaScript Directly
- Method 2: Setting an ID to an Existing Element
- Method 3: Assigning IDs in Response to Events
- Conclusion
- FAQ
In the world of web development, manipulating HTML elements is a fundamental skill every developer should master. One common task is adding an ID to an HTML element using JavaScript. The ID attribute is crucial as it allows for unique identification of elements within the DOM, making it easier to apply styles or manipulate them through scripts.
In this article, we will delve into how to set an ID to an HTML element using the Element.id property in JavaScript. Whether you’re a beginner or an experienced developer, understanding this concept will enhance your ability to interact with web pages dynamically. Let’s dive into the methods!
Understanding the Element.id Property
The Element.id property in JavaScript is a straightforward way to assign a unique identifier to an HTML element. By utilizing this property, you can not only set an ID but also retrieve it when needed. The ID you assign can be anything you choose, as long as it adheres to the rules of HTML ID naming conventions. An ID must start with a letter, and it can be followed by letters, digits, hyphens, underscores, colons, or periods.
For example, if you want to add an ID to a <div> element, you can do so by selecting the element in the DOM and then assigning a value to its id property. This method is particularly useful when you want to apply specific styles or JavaScript functionalities to that element later on.
Method 1: Setting an ID Using JavaScript Directly
One of the simplest ways to set an ID for an HTML element is by using plain JavaScript. This method is ideal for those who prefer to manipulate the DOM without relying on libraries or frameworks.
Here’s a straightforward example:
const myDiv = document.createElement('div');
myDiv.innerHTML = "DIV"
myDiv.id = 'uniqueID';
document.body.appendChild(myDiv);
In this example, we start by creating a new <div> element using document.createElement(). Next, we assign it an ID by setting the id property to ‘uniqueID’. Finally, we append this new <div> to the body of the document using appendChild(). This method ensures that the element is not only created but also added to the visible part of the webpage.
Using this approach is beneficial when you need to dynamically generate content and assign unique identifiers to elements on the fly. The flexibility of JavaScript allows you to create multiple elements, each with unique IDs, which can be very useful in applications requiring dynamic behavior.
Method 2: Setting an ID to an Existing Element
If you’re working with an existing HTML structure, you can easily set an ID to an already present element. This method is particularly useful when you want to modify elements that are part of your existing HTML.
Here’s how you can do it:
const existingElement = document.querySelector('.myElement');
existingElement.id = 'newID';
In this code snippet, we use document.querySelector() to select an existing element with the class ‘myElement’. After selecting the element, we simply assign a new ID by setting the id property to ’newID’. This method is efficient and allows for quick updates to the DOM without needing to recreate elements.
This technique is particularly useful for applications where you may want to modify the behavior of existing elements based on user interactions or application state changes. By assigning IDs dynamically, you can easily target these elements for styling or further manipulation.
Method 3: Assigning IDs in Response to Events
Another interesting approach to adding IDs is to do so in response to user actions or events. This method allows for a more interactive experience on your web page.
Here’s an example of how to implement this:
document.addEventListener('click', function(event) {
    if (event.target.matches('.clickable')) {
        event.target.id = 'clickedID';
    }
});
In this example, we set up an event listener for click events on the entire document. When the user clicks on an element that matches the class ‘clickable’, we assign it the ID ‘clickedID’. This method is particularly powerful as it allows for real-time updates to the DOM based on user interactions.
Using this technique can significantly enhance user experience by allowing elements to change dynamically in response to actions, which can be particularly useful in single-page applications or interactive web interfaces.
Complete Code:
<!DOCTYPE html>
<html>
<head>
<title>Clickable Element ID Change</title>
<style>
.clickable {
padding: 10px 20px;
background-color: #f0f0f0;
border: 1px solid #ccc;
cursor: pointer;
margin: 10px;
}
</style>
</head>
<body>
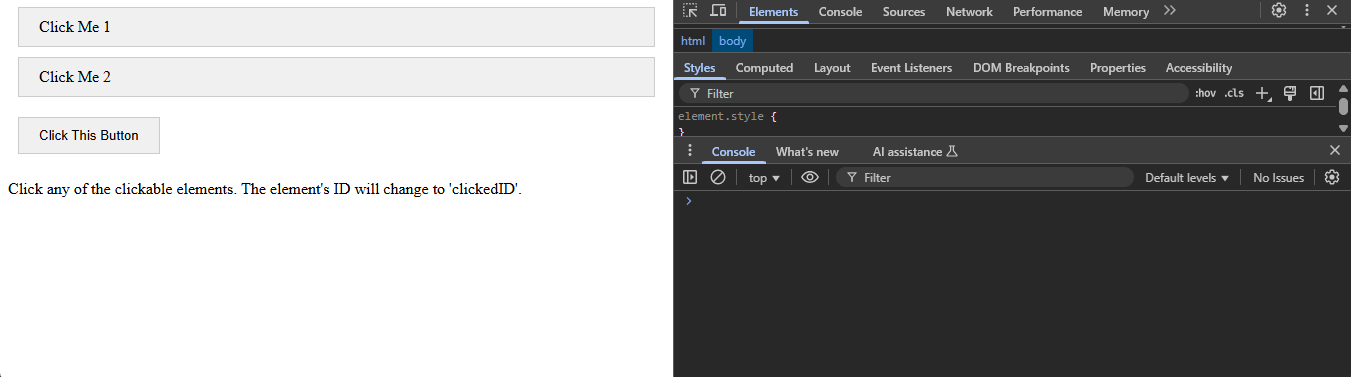
<div class="clickable">Click Me 1</div>
<div class="clickable">Click Me 2</div>
<button class="clickable">Click This Button</button>
<p>Click any of the clickable elements. The element's ID will change to 'clickedID'.</p>
<script>
document.addEventListener('click', function(event) {
if (event.target.matches('.clickable')) {
event.target.id = 'clickedID';
console.log("Element with class 'clickable' clicked. ID changed to 'clickedID'.");
console.log("Clicked element:", event.target);
}
});
</script>
</body>
</html>
Conclusion
Adding an ID to an HTML element in JavaScript is a simple yet powerful way to enhance your web development skills. Whether you are creating new elements, modifying existing ones, or responding to user events, the Element.id property provides a straightforward approach to achieving your goals. By mastering these techniques, you can create more dynamic and interactive web applications that respond to user input and adapt to changing conditions. Remember, the ID attribute is not just a label; it’s a gateway to powerful JavaScript functionalities that can elevate your web projects.
FAQ
-
How do I check if an ID is already assigned to an element?
You can check if an element has an ID by accessing the element’s id property. If it returns an empty string, then the element does not have an ID. -
Can I assign the same ID to multiple elements?
No, IDs must be unique within a single HTML document. Assigning the same ID to multiple elements can lead to unexpected behavior in your scripts. -
What happens if I change the ID of an element?
Changing the ID of an element will update its identifier in the DOM, which may affect any scripts or styles that target that ID. -
Is it possible to remove an ID from an element?
Yes, you can remove an ID by setting the id property to an empty string, like this:element.id = '';. -
Can IDs be used in CSS for styling?
Absolutely! You can use IDs in your CSS stylesheets to apply specific styles to elements. Just remember to prefix the ID with a hash symbol (#) in your CSS.

Sahil is a full-stack developer who loves to build software. He likes to share his knowledge by writing technical articles and helping clients by working with them as freelance software engineer and technical writer on Upwork.
LinkedIn