JavaFX Media Player

In this article, we will learn how to use JavaFX to make a media player in Java. To do that, we will use the built-in JavaFX and set it up manually.
Use Built-In JavaFX To Make a Media Player
To use built-in JavaFX, we need to have Java 8 because it has JavaFX in it. We don’t have to install it separately.
For this section, we are using the following tools.
- Java 8
- NetBeans 13 (you can use any IDE of your choice)
Example Code (Main.java, the main class):
// write the package name (yours may be different)
package com.mycompany.main;

// import necessary libraries
import static javafx.application.Application.launch;

import java.net.URL;
import javafx.application.Application;
import javafx.scene.Scene;
import javafx.scene.layout.Pane;
import javafx.scene.media.Media;
import javafx.scene.media.MediaPlayer;
import javafx.scene.media.MediaView;
import javafx.stage.Stage;

// Main Class
public class Main extends Application {
  // main method
  public static void main(String[] args) {
    launch(args);
  } // end main method

  /**
   *
   * @param primaryStage
   * @throws Exception
   */
  @Override
  public void start(Stage primaryStage) throws Exception {
    // path to the file
    final URL resource = getClass().getResource("/music/audio.mp3");

    // create Media Object and pass it the path of the audio file
    Media mediafile = new Media(resource.toString());

    // create MediaPlayer Object and pass the mediafile instance to it
    MediaPlayer player = new MediaPlayer(mediafile);

    // Add a mediaView, to display the media. Its necessary !
    // This mediaView is added to a Pane
    MediaView mediaView = new MediaView(player);

    // Add to scene
    Scene scene = new Scene(new Pane(mediaView), 400, 200);

    // Show the stage
    primaryStage.setTitle("Media Player");
    primaryStage.setScene(scene);
    primaryStage.show();

    // Play the media once the stage is shown
    player.play();

  } // end start
} // end Main Class
To use JavaFX, we require a primary launch class, which has to extend the Application class (a standard class in Java since Java 8). The name of the primary launch class is Main, which also extends the Application class.
We can say that the Main class is the subclass of the Application class. So, it needs to implement all the abstract methods, which is why the Main class overrides the start() method.
The start() function accepts one Stage type parameter. It is where all visual sections of the JavaFX app are displayed.
The Stage type object is created for us by the JavaFX runtime. We don’t have to create that manually.
Inside the start() method, we get the path of an audio file and save it in the resource variable, which is passed in a string format to the Media constructor and is further passed to the MediaPlayer constructor. Next, we add a mediaView to present/display the media, and it’s necessary.
Then, this mediaView is added to the Pane. We need to add the Scene to a Stage object which will be used to display something in the window of the JavaFX application.
Remember, all the components that are required to be displayed in the JavaFX app must be located inside the Scene. For this example, we are adding a Scene Object to a Stage along with the media view.
After that, we set the title, set the scene, and play the media once the stage is shown.
Now, coming to the main method. Do you know that we can launch the JavaFX app without the main() function but useful when we need to pass the command line parameters to an application.
Set Up JavaFX and Use It To Make a Media Player
To install JavaFX manually, we need to have the following things.
- Java 18
- NetBeans version 13 (you can use any IDE of your choice)
- Update the
module-info.javaandpom.xmlfiles to installjavafx.controlsandjavafx.media(complete code for every file is given below) - We are using Maven to install dependencies. You may use Gradle.
Example Code (module-info.java file):
module com.mycompany.test {
  requires javafx.controls;
  requires javafx.media;
  exports com.mycompany.test;
}
Example Code (pom.xml file):
<project xmlns="http://maven.apache.org/POM/4.0.0" xmlns:xsi="https://www.w3.org/2001/XMLSchema-instance"
xsi:schemaLocation="http://maven.apache.org/POM/4.0.0 http://maven.apache.org/maven-v4_0_0.xsd">
    <modelVersion>4.0.0</modelVersion>
    <groupId>com.mycompany</groupId>
    <artifactId>Test</artifactId>
    <version>1.0-SNAPSHOT</version>
    <properties>
        <project.build.sourceEncoding>UTF-8</project.build.sourceEncoding>
        <maven.compiler.release>11</maven.compiler.release>
        <javafx.version>16</javafx.version>
        <javafx.maven.plugin.version>0.0.6</javafx.maven.plugin.version>
    </properties>
    <dependencies>
        <dependency>
            <groupId>org.openjfx</groupId>
            <artifactId>javafx-controls</artifactId>
            <version>${javafx.version}</version>
        </dependency>
        <dependency>
            <groupId>org.openjfx</groupId>
            <artifactId>javafx-media</artifactId>
            <version>${javafx.version}</version>
        </dependency>
    </dependencies>

    <build>
        <plugins>
            <plugin>
                <groupId>org.apache.maven.plugins</groupId>
                <artifactId>maven-compiler-plugin</artifactId>
                <version>3.8.1</version>
                <configuration>
                    <release>${maven.compiler.release}</release>
                </configuration>
            </plugin>
            <plugin>
                <groupId>org.openjfx</groupId>
                <artifactId>javafx-maven-plugin</artifactId>
                <version>${javafx.maven.plugin.version}</version>
                <configuration>
                    <mainClass>com.mycompany.test.App</mainClass>
                </configuration>
            </plugin>
        </plugins>
    </build>
</project>
Example Code (App.java, the main class):
// write the package name (yours may be different)
package com.mycompany.test;

// import necessary libraries
import java.net.URL;
import javafx.application.Application;
import javafx.scene.Scene;
import javafx.scene.layout.Pane;
import javafx.scene.media.Media;
import javafx.scene.media.MediaPlayer;
import javafx.scene.media.MediaView;
import javafx.stage.Stage;

/**
 * JavaFX App
 */
public class App extends Application {
  /**
   *
   * @param primaryStage
   */
  @Override
  public void start(Stage primaryStage) {
    // path to the file
    final URL resource = getClass().getResource("/music/video.mkv");

    // create Media Object and pass it the path of the video/audio file
    Media mediafile = new Media(resource.toString());

    // create MediaPlayer Object and pass the mediafile instance to it
    MediaPlayer player = new MediaPlayer(mediafile);

    // Add a mediaView, to display the media. Its necessary !
    // This mediaView is added to a Pane
    MediaView mediaView = new MediaView(player);

    // Add to scene
    Scene scene = new Scene(new Pane(mediaView), 1080, 750);

    // Show the stage
    primaryStage.setTitle("Media Player");
    primaryStage.setScene(scene);
    primaryStage.show();

    // Play the media once the stage is shown
    player.play();
  }

  // main method
  public static void main(String[] args) {
    launch(args);
  } // end main method

} // end App class
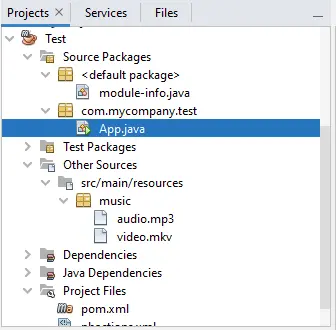
In a Java application, the module-info.java and pom.xml files reside in the default package and the Project Files. Following is the screenshot of all the files in a Java application to have a clear understanding.

This code is the same as the previous section “Use Built-in JavaFX to Make a Media Player”, except the difference is that we install the JavaFX manually and play a video file.
