How to Implement Data Access Object in Java
- Understand Data Access Object in Java
- Connect to MySQL Server in Java
- Implementation of Data Access Object in MySQL Database in Java

We will create a new database mydb and products table to show a real-time implementation of data insertion using DAO in Java.
Our DAO model is capable of using CRUD applications dynamically. It uses the JDBS driver of mysql-connector-java-8.0.22 for database connection.
It successfully abstracts the object’s underlying data access implementation to deliver transparent access to the data.
Understand Data Access Object in Java
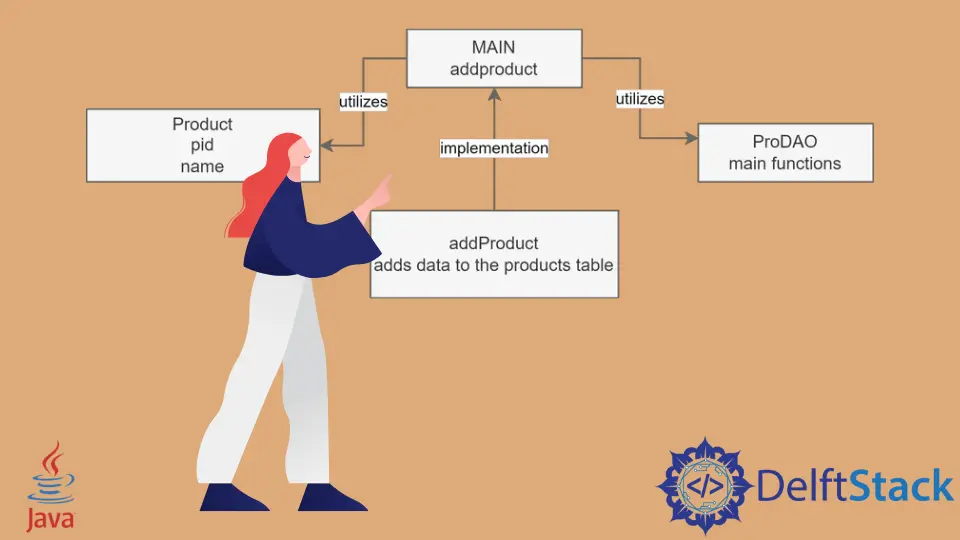
We will use this pattern to implement our interface with DAO. This model is a rough representation of a custom but fully functional Java data access object that can manage abstract data sources.
Suppose you want to change the database operation. All you need to do is modify the main class.
In this case, our main class is defined as the JDBC demo.
DAO Pattern:

We will not confuse you in the beginning. Therefore, we will keep it as simple as necessary to build a logic not to copy and paste but create your interfaces.
That said, this is our product class that contains product values passed through a constructor thrown in the main class that is an instance of an object of the function that is addProduct in this example.
// Product class
class Product {
  int id;
  String name;
  // add more values
}
And, then we have an interface that uses data access object patterns to manage our database. Let’s keep it essential for the time being.
Check out a simple function that can add products to the database table.
public static void main(String[] args) {
  // Now let us insert new product
  // constructor PDAO class
  // objects
  ProDAO dao2 = new ProDAO(); // constructor
  Product pro = new Product(); // constructor
  // values to insert
  // dynamically modify values from here later
  pro.id = 3;
  pro.name = "Oppo LOL";
  // we have created a separate function for the db connection
  dao2.Dbconnect();
  // it is set to addProduct as of now, you can run CRUD directly from here
  dao2.addProduct(pro);
}
This is a typical demo of the DAO that we will execute in the implementation code section.
Please note that we will create a database in MySQL, and then we will use the MySQL connector jar file to connect with the SQL server.
Do not worry! Because we will also show you how to create the database using CLI.
If you are using Windows OS:

However, you can use GUI(s) such as MySQL Workbench, SQL Yog, phpMyAdmin to create your preferred database.
Connect to MySQL Server in Java
To keep things in perspective and avoid dirty code. We will create a separate database function.
// Database Connection will use jdbc driver from the mysql connector jar
public void Dbconnect() {
  try {
    Class.forName("com.mysql.cj.jdbc.Driver"); // Mysql Connector's JDBC driver is loaded
    // connection to mysql
    con = DriverManager.getConnection(
        "jdbc:mysql://localhost/mydb", "root", ""); // URL, database name after
    // localhost, user name,
    // password
  } catch (Exception ex) {
    System.out.println(ex);
  }
}
You can use this connection for your MySQL projects. And do not forget that if you are using an old version of Java, please use the Class.forName("com.mysql.jdbc.Driver"); for loading JDBC.
Implementation of Data Access Object in MySQL Database in Java
First, it would help build the path correctly to avoid exceptions and warnings during runtime.
The frequent errors can be avoided by clicking right on your Java project, building path, and configuring jar files. Just make sure your build path is like in the image below.

If your concept is clear, you will understand the following DAO implementation of our model. Nevertheless, we have commented on each element of the code for you.
import java.sql.Connection;
import java.sql.DriverManager;
import java.sql.PreparedStatement;

// This Data Access Object DAO is a dynamic way to handle database records.

// main class
class DAOexample {
  public static void main(String[] args) {
    // Now let us insert new product
    // constructor PDAO class
    // objects
    ProDAO dao2 = new ProDAO(); // constructor
    Product pro = new Product(); // constructor
    // values to insert
    // dynamically modify values from here later
    pro.id = 3;
    pro.name = "Oppo LOL";
    // we have created a separate function for the db connection
    dao2.Dbconnect();
    // it is set to addProduct as of now, you can run CRUD directly from here
    dao2.addProduct(pro);
  }
}

class ProDAO {
  Connection con = null;

  // Database Connection will use jdbc driver from the mysql connector jar
  public void Dbconnect() {
    try {
      Class.forName("com.mysql.cj.jdbc.Driver");
      // connection to mysql
      con = DriverManager.getConnection(
          "jdbc:mysql://localhost/mydb", "root", ""); // URL, database name after
      // localhost, user name,
      // password
    } catch (Exception ex) {
      System.out.println(ex);
    }
  }

  // We will use the insert operation in this function, its conductor is already
  // declared in the main class (DAO)
  public void addProduct(Product p) { // this function will insert values
    // insert query
    // using prepared statements
    String query2 = "insert into products values (?,?)";
    try {
      PreparedStatement pst;
      pst = con.prepareStatement(query2);
      pst.setInt(1, p.id);
      pst.setString(2, p.name); //
      pst.executeUpdate(); // executeUpdate is used for the insertion of the data
      System.out.println("Inserted!");
    } catch (Exception ex) {
    }
  }
}

// Product class
class Product {
  int id;
  String name;
  // add more values
}
Output:

If you still have any queries, we provide the complete zip folder of this implementation containing jar files and everything you need to configure your first DAO.
Sarwan Soomro is a freelance software engineer and an expert technical writer who loves writing and coding. He has 5 years of web development and 3 years of professional writing experience, and an MSs in computer science. In addition, he has numerous professional qualifications in the cloud, database, desktop, and online technologies. And has developed multi-technology programming guides for beginners and published many tech articles.
LinkedIn