How to Set Upstream Branch in Git
- What is an Upstream Branch?
- Method 1: Using the git push Command with –set-upstream
- Method 2: Using git branch Command with –set-upstream-to
- Method 3: Setting Upstream Branch During Checkout
- Conclusion
- FAQ
Setting up an upstream branch in Git is a crucial step for developers who want to maintain synchronization between their local repository and a remote one. This process allows you to track remote branches effortlessly, making it easier to push and pull changes without needing to specify the remote branch each time. Understanding how to set an upstream branch can significantly streamline your workflow, especially when collaborating on projects with multiple contributors.
In this article, we’ll explore the methods to set an upstream branch using the set-upstream command in Git, ensuring you have the knowledge to manage your branches effectively.
What is an Upstream Branch?
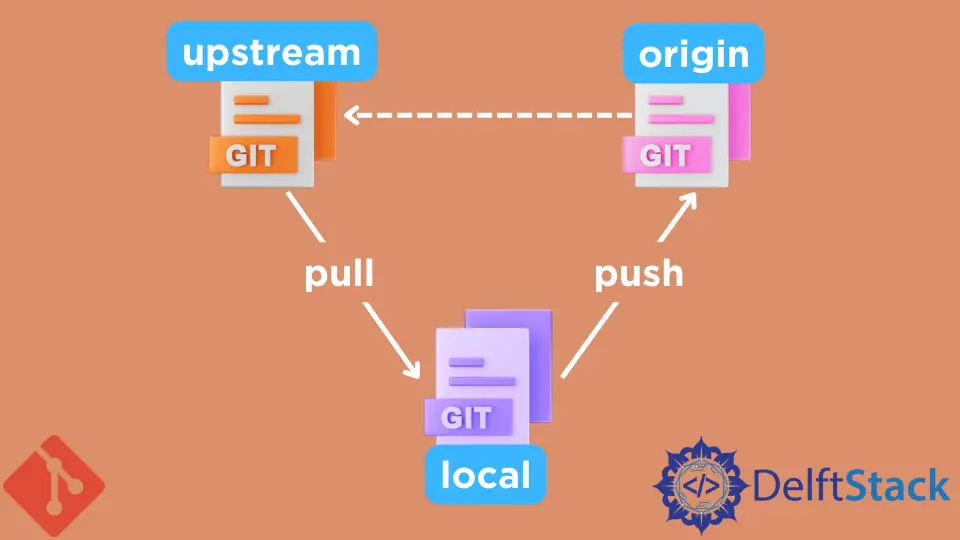
Before diving into the methods, it’s essential to understand what an upstream branch is. An upstream branch is a remote branch that your local branch will track. When you set an upstream branch, Git knows which remote branch to compare against when you run commands like git pull or git push. This tracking simplifies your workflow, allowing you to focus on coding rather than managing branches manually.
Method 1: Using the git push Command with –set-upstream
One of the most straightforward ways to set an upstream branch is by using the git push command with the --set-upstream flag. This method is particularly useful when you’re creating a new branch locally and want to associate it with a remote branch for the first time.
Here’s how you can do it:
git checkout -b my-feature-branch
git push --set-upstream origin my-feature-branch
Output:
To https://github.com/username/repo.git
 * [new branch]      my-feature-branch -> my-feature-branch
Branch 'my-feature-branch' set up to track remote branch 'my-feature-branch' from 'origin'.
In this example, we first create a new branch called my-feature-branch using the git checkout -b command. After switching to this branch, we push it to the remote repository with the --set-upstream option. This command tells Git to set the remote branch as the upstream branch for our local branch. The output confirms that the new branch has been created on the remote and is now being tracked locally.
This method is convenient because it combines the creation of the branch and the setup of the upstream tracking in one command. You can immediately start working on your feature and push changes without additional configuration.
Method 2: Using git branch Command with –set-upstream-to
Another method to set an upstream branch is by using the git branch command with the --set-upstream-to option. This approach is beneficial when you already have a local branch and want to link it to an existing remote branch.
Here’s how to do it:
git checkout my-feature-branch
git branch --set-upstream-to=origin/my-feature-branch
Output:
Branch 'my-feature-branch' set up to track remote branch 'my-feature-branch' from 'origin'.
In this case, we first switch to the existing branch my-feature-branch using git checkout. Then, we use the git branch --set-upstream-to command to set the upstream branch to origin/my-feature-branch. This command establishes the connection between your local branch and the corresponding remote branch.
This method is particularly useful if you have already created the branch and want to link it to a remote branch later. It keeps your workflow organized without the need to push changes immediately.
Method 3: Setting Upstream Branch During Checkout
If you want to set an upstream branch while checking out a branch that already exists on the remote, you can use the git checkout command with the -b option. This method is efficient for quickly switching to a remote branch and establishing tracking.
Here’s how you can do it:
git checkout -b my-feature-branch origin/my-feature-branch
Output:
Branch 'my-feature-branch' set up to track remote branch 'my-feature-branch' from 'origin'.
In this example, we create a new local branch my-feature-branch that tracks the remote branch origin/my-feature-branch. By specifying both the branch name and the remote branch during checkout, Git automatically sets the upstream branch for us.
This method is particularly handy when you want to work on a branch that has already been created on the remote but does not exist locally. It saves you the extra step of setting the upstream branch after checking it out.
Conclusion
Setting an upstream branch in Git is a fundamental skill every developer should master. Whether you use the git push --set-upstream, git branch --set-upstream-to, or git checkout -b commands, each method provides a simple way to keep your local and remote branches in sync. By establishing this connection, you can streamline your workflow, making collaboration on projects more efficient and less error-prone. As you become more comfortable with these commands, you’ll find that managing branches in Git becomes a seamless part of your development process.
FAQ
-
What does it mean to set an upstream branch in Git?
Setting an upstream branch in Git means linking your local branch to a remote branch, allowing Git to track changes between the two. -
Can I set an upstream branch after creating a local branch?
Yes, you can use thegit branch --set-upstream-tocommand to link an existing local branch to a remote branch.
-
Is it necessary to set an upstream branch?
While it’s not strictly necessary, setting an upstream branch simplifies the process of pushing and pulling changes, making it a best practice. -
What happens if I don’t set an upstream branch?
If you don’t set an upstream branch, you’ll need to specify the remote branch every time you push or pull changes, which can be cumbersome. -
Can I change the upstream branch later?
Yes, you can change the upstream branch at any time using thegit branch --set-upstream-tocommand.
Related Article - Git Remote
- How to Add SSH in Git Remote
- How to Remove Upstream Repository in Git
- How to Create a Remote Repository From a Local Repository in Git
- How to Synchronize a Local Repository With a Remote Repository in Git
- How to Update a Repository by Setting Up a Remote
- How to Push From an Existing Remote Repository to a Different Remote Repository in Git