How to Create SQL Database in C#

This article will provide an overview of establishing an SQL database and a table inside it so that data may be read and written.
Steps to Create an SQL Database
The following are the steps to create an SQL database.
-
Launch the SQL Management Studio to get started.
-
To connect, you will need to enter the Server name, which will look something like
(LocalDB)MSSQLLocalDB, and then click theConnectbutton. -
To create a new database, right-click the Database icon on the left panel, and then choose
New databasefrom the context menu. And lastly, give it a name. -
After that, choose
New Queryfrom the drop-down menu, and then compose your query as follows:use readwrite create table mydata (id int primary key identity(1,1),myname varchar(50),Email varchar(50),phone varchar(50)) select * from mydata
Create a Windows Form in Microsoft Visual Studio
In Microsoft Visual Studio, your first step should be to create a new project. Choose Windows Form Application C# from the drop-down option labeled Project Type.
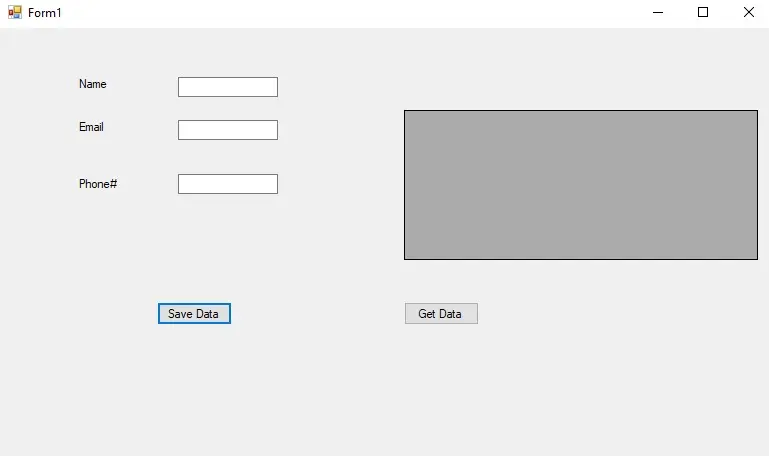
It will generate a form that will include two files: one named form.cs and the other form.cs (Design). Add three labels to the design file and call them nameTxt, emailTxt, and phoneTxt.
Fill each one with the words Name, Email, and Phone# correspondingly. Save the project.
You should make two buttons and give them the names getData and saveData. Enter Save Data and Get Data into the text box provided for the button.
Moreover, a data grid view should be added to the form. This grid view should get the data from the already existing table in the database and output all of the table’s contents.
Here is a visual representation of the form we’ve just completed.

Implement the Functions
First, we will create a variable of type SqlDataAdapter and give it the name da. This will be what we use to get data from the table that is stored in the database.
SqlDataAdapter da = new SqlDataAdapter(
    "SELECT \* FROM mydata",
    @"Data Source=(LocalDB)\MSSQLLocalDB ; Initial Catalog=readwrite; Integrated Security=True");
Next, we will build a database connection with an object of type SqlConnection that will be given the name con. Here, we will provide our data source, Database name, and integrated security.
SqlConnection con = new SqlConnection(
    @"Data Source=(LocalDB)\MSSQLLocalDB ; Initial Catalog=readwrite; Integrated Security=True");
SqlCommand cmd;
Now is the time for us to create the code for the Save button. To begin, we will initiate the connection with the database so that we may start performing functions.
We will collect the data from the text boxes, then store it in the database that has been provided to us with the help of an insert query that we will attach to the SqlCommand object. After that, a dialog box will appear to check if the data was successfully entered.
private void Savebtn_Click(object sender, EventArgs e) {
  con.Open();
  cmd = new SqlCommand("insert into mydata values ('" + nametxt.Text + "','" + emailtxt.Text +
                           "','" + phonetxt.Text + "')",
                       con);
  cmd.ExecuteNonQuery();
  MessageBox.Show("Data is Saved");
  con.Close();
  nametxt.Clear();
  emailtxt.Clear();
  phonetxt.Clear();
}
At last, we will write the code for bringing the data into the dataGridView. To do so, build an object of the DataSet type and then populate it with the data taken from the database.
private void Getbtn_Click(object sender, EventArgs e) {
  DataSet ds = new DataSet();
  da.Fill(ds, "mydata");
  dataGridView1.DataSource = ds.Tables["mydata"].DefaultView;
}
Source Code:
using System;
using System.Collections.Generic;
using System.ComponentModel;
using System.Data;
using System.Drawing;
using System.Linq;
using System.Text;
using System.Threading.Tasks;
using System.Windows.Forms;
using System.Data.SqlClient;

namespace Saad_artilce_final_version {
  public partial class Form1 : Form {
    SqlDataAdapter da = new SqlDataAdapter(
        "SELECT * FROM mydata",
        @"Data Source=(LocalDB)\MSSQLLocalDB ; Initial Catalog=readwrite; Integrated Security=True");

    SqlConnection con = new SqlConnection(
        @"Data Source=(LocalDB)\MSSQLLocalDB ; Initial Catalog=readwrite; Integrated Security=True");
    SqlCommand cmd;
    public Form1() {
      InitializeComponent();
    }

    private void Savebtn_Click(object sender, EventArgs e) {
      con.Open();
      cmd = new SqlCommand("insert into mydata values ('" + nametxt.Text + "','" + emailtxt.Text +
                               "','" + phonetxt.Text + "')",
                           con);
      cmd.ExecuteNonQuery();
      MessageBox.Show("Data is Saved");
      con.Close();
      nametxt.Clear();
      emailtxt.Clear();
      phonetxt.Clear();
    }

    private void Getbtn_Click(object sender, EventArgs e) {
      DataSet ds = new DataSet();
      da.Fill(ds, "mydata");
      dataGridView1.DataSource = ds.Tables["mydata"].DefaultView;
    }
  }
}
Output:


I'm a Flutter application developer with 1 year of professional experience in the field. I've created applications for both, android and iOS using AWS and Firebase, as the backend. I've written articles relating to the theoretical and problem-solving aspects of C, C++, and C#. I'm currently enrolled in an undergraduate program for Information Technology.
LinkedIn