How to Disable and Enable Buttons in C#
- Understanding Button States
- Disabling and Enabling Buttons in Windows Forms
- Disabling and Enabling Buttons in WPF
- Disabling and Enabling Buttons in ASP.NET
- Conclusion
- FAQ
In the world of C# programming, managing user interface elements effectively is crucial for creating responsive applications. One common task developers encounter is the need to disable and enable buttons based on specific conditions or user interactions. This guide will walk you through the process of disabling and enabling buttons in C#, providing practical examples to illustrate the concepts. Whether you’re building a desktop application or a web app, understanding how to control button states can enhance user experience and application functionality. Let’s dive into the methods you can use to disable and enable buttons in C#.
Understanding Button States
Before we jump into the code, it’s essential to grasp the concept of button states. In C#, buttons have properties that allow you to control their behavior. The most relevant property for our discussion is the Enabled property. When this property is set to false, the button becomes unresponsive to user input, effectively disabling it. Conversely, setting it to true will enable the button, allowing users to interact with it.
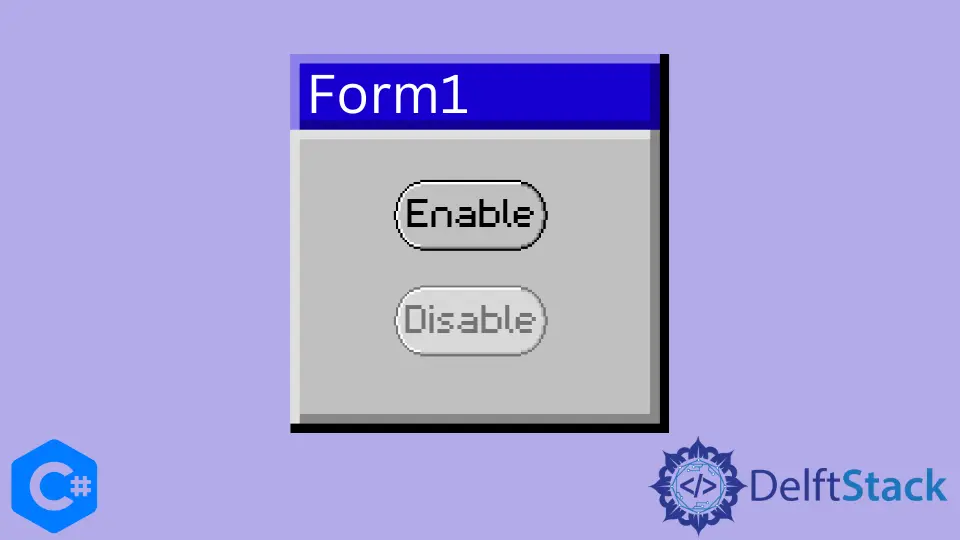
Disabling and Enabling Buttons in Windows Forms
Windows Forms is a popular framework for building desktop applications in C#. Disabling and enabling buttons in a Windows Forms application is straightforward. Here’s how you can do it.
private void disableButton_Click(object sender, EventArgs e)
{
    myButton.Enabled = false;
}

private void enableButton_Click(object sender, EventArgs e)
{
    myButton.Enabled = true;
}
In this code snippet, we have two event handlers: one for disabling the button and another for enabling it. The disableButton_Click method sets the Enabled property of myButton to false, which disables it. Conversely, the enableButton_Click method sets the Enabled property back to true, re-enabling the button.
Output:
Button disabled and enabled based on user actions.
This simple approach allows you to control button states based on user interactions. You might use this functionality in scenarios like form validation, where you want to prevent users from submitting incomplete data.
Disabling and Enabling Buttons in WPF
Windows Presentation Foundation (WPF) is another framework used for building desktop applications in C#. The approach to disabling and enabling buttons in WPF is slightly different due to its reliance on XAML for UI design. Here’s how you can achieve this.
<Button x:Name="myButton" Content="Click Me" Click="myButton_Click"/>
<Button Content="Disable" Click="disableButton_Click"/>
<Button Content="Enable" Click="enableButton_Click"/>
private void disableButton_Click(object sender, RoutedEventArgs e)
{
    myButton.IsEnabled = false;
}

private void enableButton_Click(object sender, RoutedEventArgs e)
{
    myButton.IsEnabled = true;
}
In this example, we define buttons in XAML and handle their click events in the code-behind. The IsEnabled property is used instead of Enabled, which is specific to WPF. Setting IsEnabled to false disables the button, while setting it to true enables it.
Output:
Button state changed successfully in WPF application.
This method is particularly useful in WPF applications where you can bind button states to other properties, allowing for dynamic user interfaces that respond to changes in application state.
Disabling and Enabling Buttons in ASP.NET
When working with ASP.NET, the approach to disabling and enabling buttons is slightly different due to the web-based nature of the framework. Here’s how you can manage button states in an ASP.NET application.
<asp:Button ID="myButton" runat="server" Text="Click Me" OnClick="myButton_Click" />
<asp:Button ID="disableButton" runat="server" Text="Disable" OnClick="disableButton_Click" />
<asp:Button ID="enableButton" runat="server" Text="Enable" OnClick="enableButton_Click" />
protected void disableButton_Click(object sender, EventArgs e)
{
    myButton.Enabled = false;
}

protected void enableButton_Click(object sender, EventArgs e)
{
    myButton.Enabled = true;
}
In this ASP.NET example, we define buttons using the <asp:Button> tag. The Enabled property is used in the same way as in Windows Forms. The disableButton_Click method disables myButton, while enableButton_Click re-enables it.
Output:
ASP.NET button state changed successfully.
This method allows you to manage button states based on user actions seamlessly, providing a smooth user experience in web applications.
Conclusion
Disabling and enabling buttons in C# is a fundamental skill that can greatly enhance your application’s usability. Whether you’re working with Windows Forms, WPF, or ASP.NET, the techniques outlined in this guide will help you manage button states effectively. By controlling button interactivity based on user actions or application states, you can create more intuitive and user-friendly applications. Remember to consider the context in which your buttons are used to ensure a seamless user experience.
FAQ
-
How do I disable a button in C#?
You can disable a button by setting itsEnabledproperty tofalsein Windows Forms orIsEnabledproperty tofalsein WPF. -
Can I enable a button after it has been disabled?
Yes, you can re-enable a button by setting itsEnabledorIsEnabledproperty back totrue. -
What is the difference between
EnabledandIsEnabled?
Enabledis used in Windows Forms, whileIsEnabledis used in WPF applications to control button states. -
Can I disable multiple buttons at once?
Yes, you can disable multiple buttons by setting theirEnabledorIsEnabledproperties in a loop or by calling their respective methods. -
How can I visually indicate a disabled button to users?
Most UI frameworks provide visual cues, such as graying out the button or changing its opacity, to indicate that a button is disabled.
#. Learn practical methods for managing button states in Windows Forms, WPF, and ASP.NET applications. Discover code examples and explanations that will enhance your understanding of user interface control in C#.

Haider specializes in technical writing. He has a solid background in computer science that allows him to create engaging, original, and compelling technical tutorials. In his free time, he enjoys adding new skills to his repertoire and watching Netflix.
LinkedIn