How to Select Pin for I2c on an Arduino Uno
- Understanding I2C Communication
- Setting Up the Arduino for I2C Communication
- Troubleshooting I2C Communication Issues
- Conclusion
- FAQ
I2C (Inter-Integrated Circuit) is a powerful communication protocol widely used in Arduino projects to connect various sensors, displays, and other devices. If you’re working with an Arduino Uno, selecting the right pins for I2C communication is crucial for successful data transfer.
In this article, we’ll guide you through the process of selecting I2C pins, configuring them, and providing practical code examples to help you communicate effectively with I2C devices. Whether you’re just starting or are an experienced developer looking to refine your skills, this comprehensive guide will enhance your Arduino projects and streamline your development process.
Understanding I2C Communication
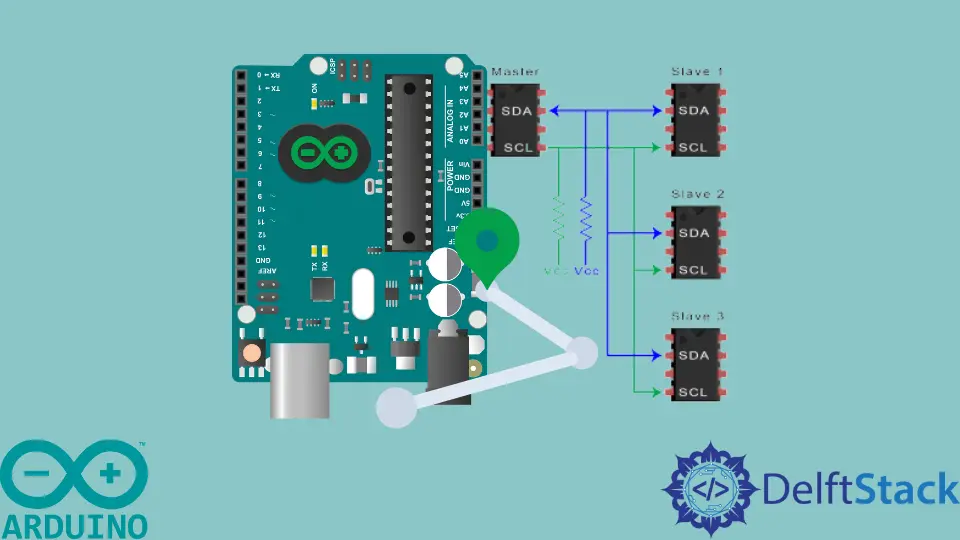
Before diving into pin selection, it’s essential to understand how I2C works. I2C is a multi-master, multi-slave protocol that uses two wires for communication: the Serial Data Line (SDA) and the Serial Clock Line (SCL). The Arduino Uno has dedicated pins for these functions, making it easier to set up I2C communication. For additional guidance on configuring Arduino communication settings, you might find this article on How to Set Baud Rate in Arduino Serial Communication useful.
I2C Pins on Arduino Uno
On the Arduino Uno, the default I2C pins are:
- SDA (Data Line) - Pin A4
- SCL (Clock Line) - Pin A5
These pins are hardwired to the I2C interface, which means you should use them for any I2C devices you want to connect.
Setting Up the Arduino for I2C Communication
To set up your Arduino Uno for I2C communication, you need to follow a few simple steps. This includes wiring your I2C devices correctly, installing the necessary libraries, and writing the code to initiate communication. Additionally, you can explore how using the Arduino ICSP can complement your setup process.
Wiring the I2C Devices
- Connect the SDA pin (A4) of the Arduino Uno to the SDA pin of your I2C device.
- Connect the SCL pin (A5) of the Arduino Uno to the SCL pin of your I2C device.
- Don’t forget to connect the ground (GND) of your Arduino to the ground of the I2C device.
- If your I2C device requires power, connect it to the appropriate voltage source (usually 5V).
Installing the Required Libraries
To communicate with I2C devices, you may need to install the Wire library, which is included by default in the Arduino IDE. This library simplifies the process of I2C communication. Knowing how to install and utilize libraries is often a first step in How to Program Arduino With C++.
Writing the Code
Once everything is set up, you can write the code to communicate with your I2C device. Here’s a simple example that reads data from an I2C sensor.
#include <Wire.h>

void setup() {
    Wire.begin();
    Serial.begin(9600);
}

void loop() {
    Wire.requestFrom(8, 1);
    while (Wire.available()) {
        char c = Wire.read();
        Serial.println(c);
    }
    delay(1000);
}
In this code, we include the Wire library and initialize it in the setup function. The loop function requests data from the I2C device with address 8. It then reads the available data and prints it to the Serial Monitor.
Output:
example of output
This code enables you to read data from an I2C device effectively. Just make sure to replace the address and the data handling logic according to your specific device requirements.
Troubleshooting I2C Communication Issues
Even with the right pins and code, you may encounter issues while communicating with I2C devices. Here are some common troubleshooting tips:
- Check Connections: Ensure all your connections are secure. Loose wires can lead to communication failures.
- Verify Addresses: Make sure you are using the correct I2C address for your device. You can often find this in the device’s datasheet.
- Pull-Up Resistors: I2C requires pull-up resistors on the SDA and SCL lines. If your device doesn’t have them, you may need to add them externally (typically 4.7kΩ).
- Check Device Compatibility: Not all devices are compatible with every Arduino board. Make sure your I2C device is compatible with the Arduino Uno.
Conclusion
Selecting the right pins for I2C communication on an Arduino Uno is a straightforward process, thanks to its dedicated SDA and SCL pins. By following the steps outlined in this guide, you can set up I2C communication effectively, troubleshoot common issues, and enhance your Arduino projects. Whether you’re a beginner or an experienced developer, mastering I2C communication will open up a world of possibilities for your projects.
FAQ
-
What are the I2C pins on an Arduino Uno?
The I2C pins on an Arduino Uno are SDA (A4) and SCL (A5). -
Do I need pull-up resistors for I2C?
Yes, pull-up resistors are necessary for proper I2C communication. If your device doesn’t have them, you may need to add them externally. -
Can I use other pins for I2C communication on Arduino Uno?
No, the Arduino Uno has dedicated pins for I2C communication, which are A4 (SDA) and A5 (SCL). -
How can I troubleshoot I2C communication issues?
Check your connections, verify the I2C address, ensure pull-up resistors are in place, and confirm device compatibility. -
What library do I need for I2C communication in Arduino?
You need the Wire library, which is included by default in the Arduino IDE.